Projects Module
The Projects Module creates, manages, and deletes clients as well as projects. After a project is created the Client is represented with the  icon in the Projects Module Navigation as the topmost level icon in the Module Group’s tree view. An active project is represented underneath the client in the group’s tree view with the
  icon. An active project linked to Review in an AWS environment is represented underneath the client in the tree view with a green
  icon.
icon.
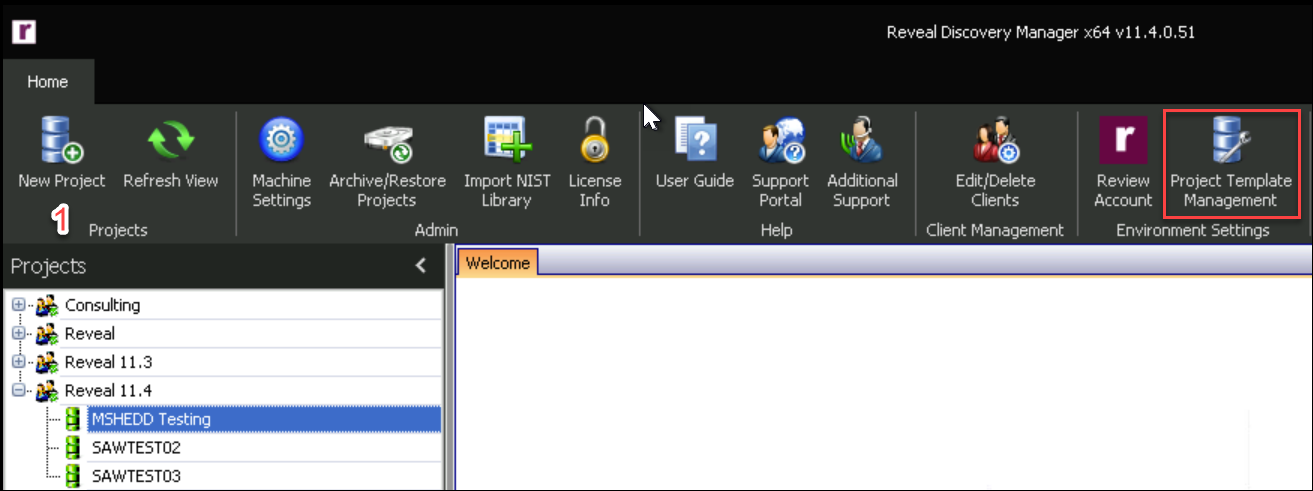 |
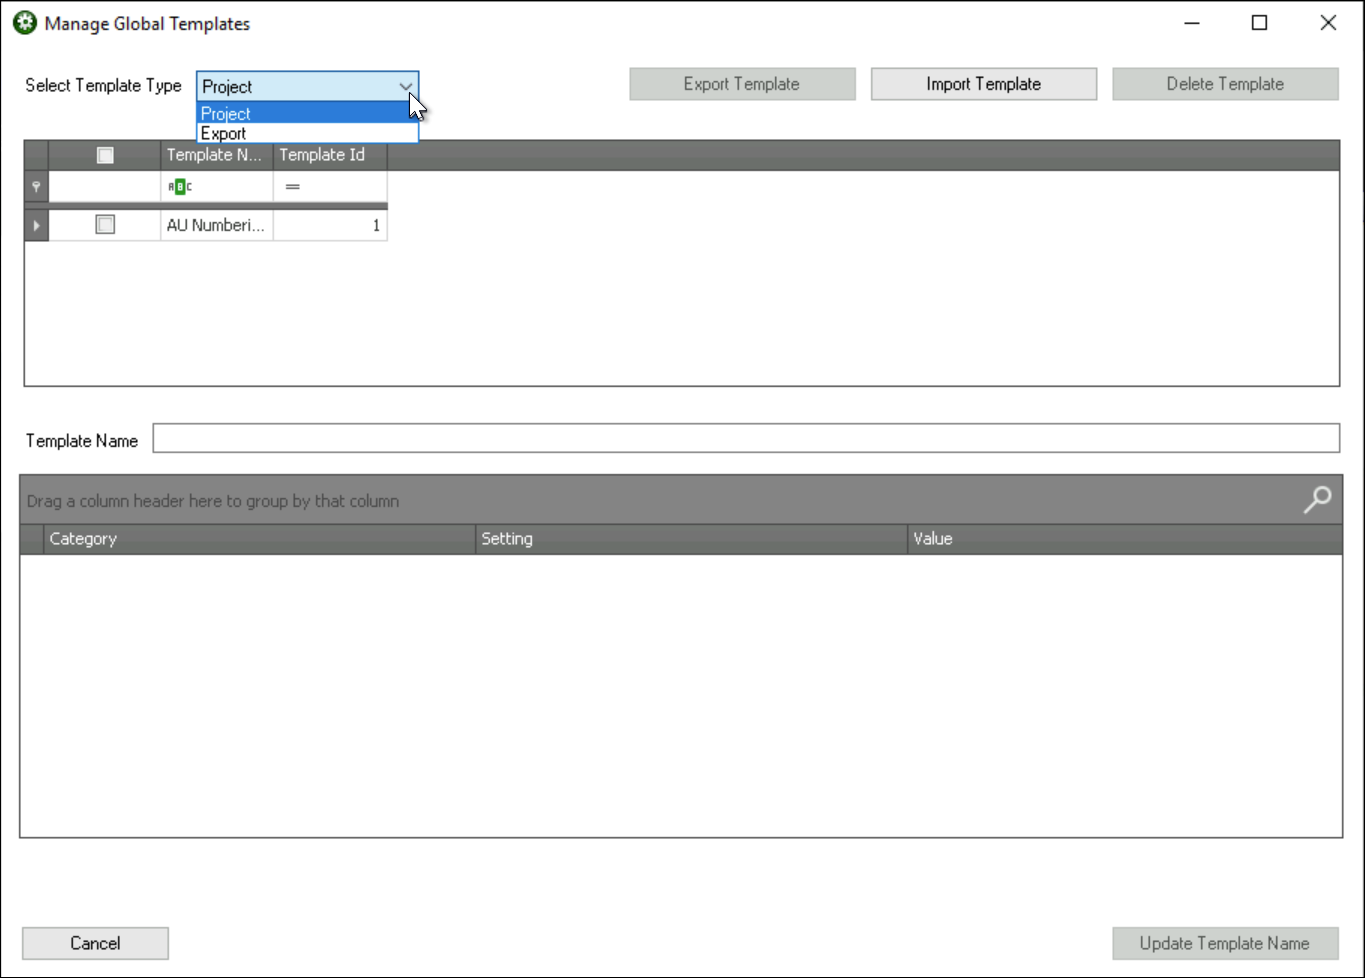
Note that a Project Template Management feature allows you to view, import, export or delete Project and Export templates. These templates are configured and may be created during the New Project specification and Export process, respectively, saving time and preserving consistency in repetitive tasks.
Creating a New Project
New Project – Click the New Project button on the Home tab to launch the New Project Creation wizard form:
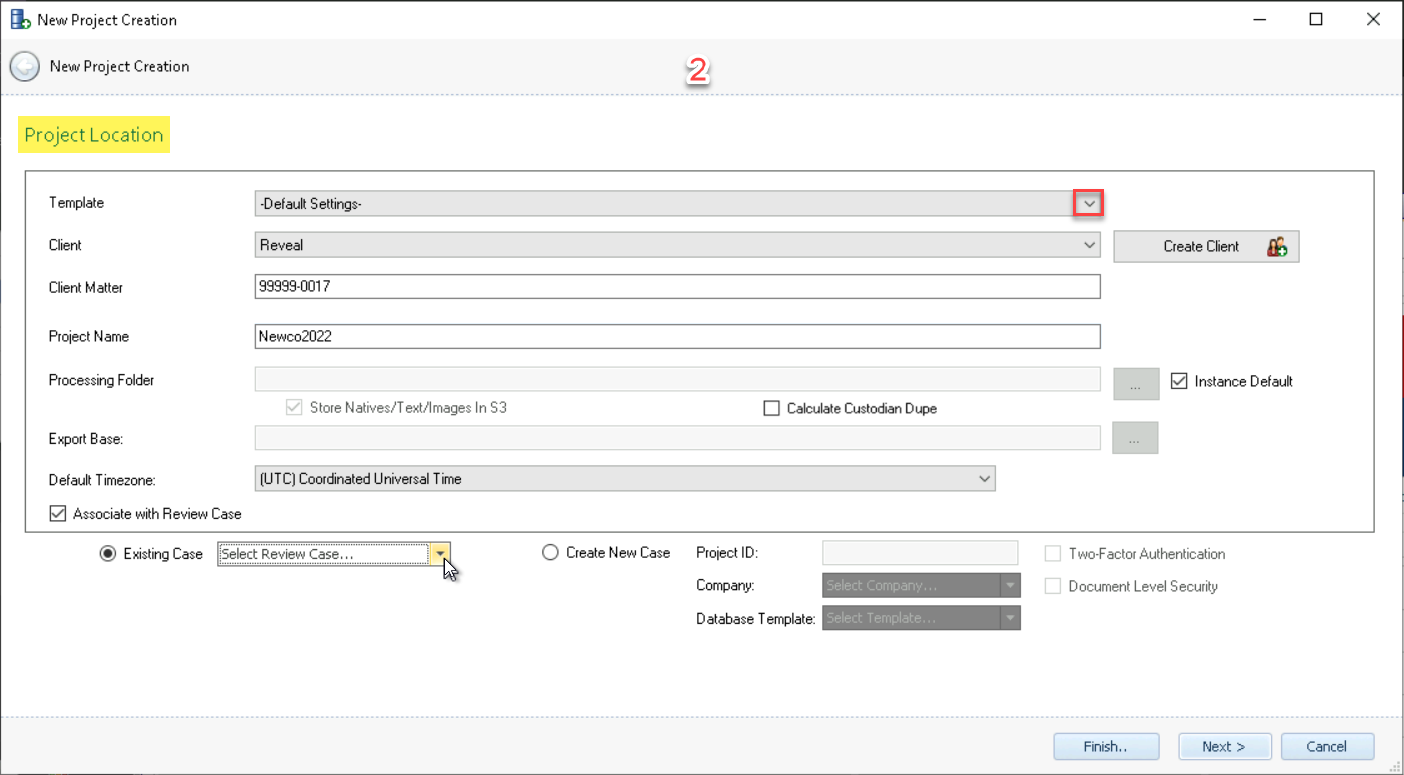
Project Location – The Project Location screen contains the following setting options:
Template – A collection of saved settings stored as a Template may be retrieved here.
If a template is selected from the drop-down, all settings that were saved will be repopulated in the wizard pages. The selection may be returned to -Default Settings- to clear the template from this project.
If no template is selected here, the option to save a template is the last step in the project creation process; if a template is saved during this last step, all settings that have been selected in the previous project creation wizard pages will be saved to the template, and the template will be available in the drop-down for creating future projects.
Templates are managed from the Project Template Management button on the Environment Module ribbon.
Client – Every project must be associated with a client. If the Client does not exist in the drop-down menu, click the Create Client button.
Client Matter – This is the billing number of the client.
Project Name – This Project Name will be displayed in the Projects Module Navigation.
Processing Folder – The Processing Folder is the location where Reveal stores all work-product for the project. The default selection of checking Instance Default will replace the opportunity to set a value here; it will also default to checking Store Natives/Text/Images in S3. It is important that the processing folder’s location contains enough space to process all the data for the project. If not using the Instance Default, click the
 button to create the processing folder by navigating to the appropriate location and clicking Make New Folder. To properly maintain the project, never manipulate or delete this folder.
Export Base – At this path, a folder named Exports will be created when the first Export is initiated. Underneath this Export folder, a folder will be created for each export using the Export Name. By default, Export Base will default to the project’s Processing Folder set in Instance Settings in the Environment Module and selected by checking Instance Default. To change this, uncheck Instance Default and click the
 button and browse to another path.
Default Timezone – This will automatically choose the selected timezone within the Import Module. The timezone can be changed at import time by selecting a new timezone.
Instance Default -- This checkbox applies Instance Settings configured in the Environment Module to the project, for example, assigning Exports for this project to be written under a defined default Export folder for the current instance of Discovery Manager.
There are options available on this screen applicable to the AWS hosted Reveal Discovery and Review platform where jobs may be pushed directly to a Discovery Manager project's defined Reveal Review project. The new project's associated Review case would be selected or created here. If this integration is of interest to your organization please contact your Reveal Success Coordinator to discuss this option in greater detail. Any change to the project name in Review will be picked up and applied to the related Processing project upon notification and approval of the user.
Finish – The Finish button expedites the project creation process by jumping to the last page of the Project Wizard. This is typically used when a Template is used and no settings need to be adjusted past the first wizard page.
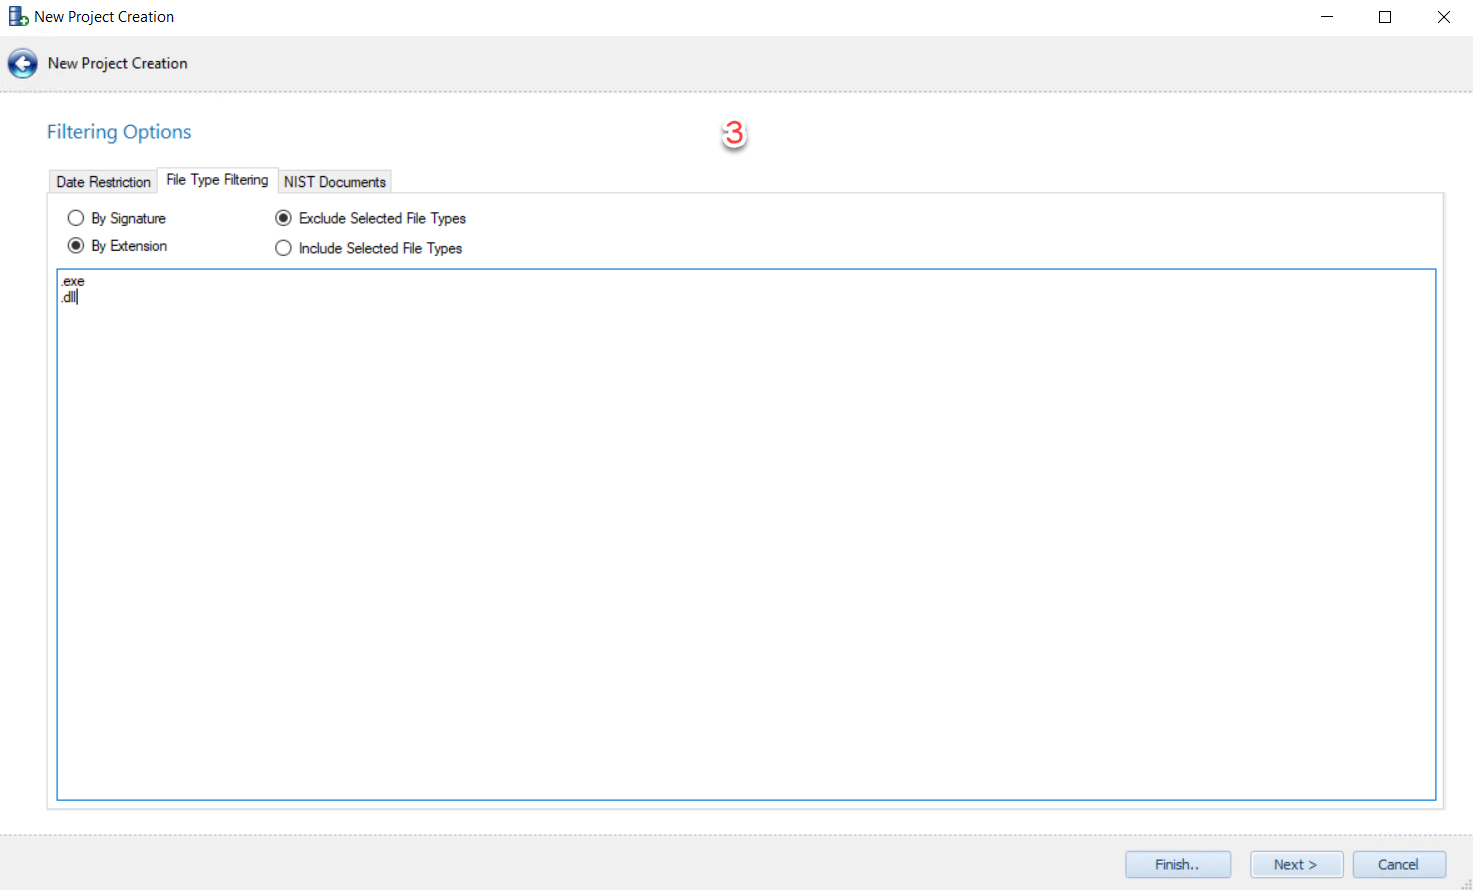
Filtering Options – Filtering Options are settings when creating a project that will filter files out of the project. Filtering defines native files that are not brought into the project (i.e. they are removed from the project), but a record of these files is kept in the database for reporting purposes.
Date Restriction – The Project Level Date Restrictions are inclusive date restrictions. This means the files that meet the date restriction will be kept in the project. Files that fall outside of the date restriction will be filtered out of the project.
To add a date restriction, check the
 checkbox, choose either After (any files on or after the date will be kept), Before (any files on or before the date will be kept), or Between (any files on or between the two dates will be kept) from the drop-down box, and click the
  button to choose the applicable date(s).
File Type Filtering – All files are processed by default. There are 4 different settings to selectively process files:
File Type Exclusion By Extension – To selectively exclude files based on their extension, select By Extension and type the extension(s) that will be excluded (one extension per line) or drag and drop a list of extensions into the box, and the files with the extensions will be treated as filter files.
Note
All extensions are normalized by the system, meaning the extensions are not case sensitive and can be added with or without a period ‘.’ in front of the extension.
File Type Exclusion By Signature – To selectively exclude files from processing based on their signature, choose By Signature and select among the items listed below for files to be treated as filter files.
Note
During import all archive children are extracted from the parent archive file and added to the project as individual files. When an archive file is treated as a filter file the archive children will not be extracted from the parent archive file, thus the ability to report on the archive children will be lost.
Exclude Selected File Types – This is the default paired with the By Signature and By Extension file filtering options set forth above.
Include Selected File Types – To selectively include files based on their signature, either choose:
the By Signature option and check the particular item(s) and only these item(s) to be kept in the project, with all other files will be treated as filter files; or
the By Extension option and type the extension(s) that will be included (one extension per line) or drag and drop a list of extensions into the box, and only files with the extensions will be kept in the project and all other files will be treated as filter files.
NIST Documents – The National Institute of Standards and Technology (NIST) creates an evolving list of hash values that identify system files. These hash values need to be imported into Discovery Manager by your administrator in order for the NIST filter setting to work properly. By default, NIST files are retained in the processing folder and processed just like any other file. To treat NIST files as filter files, choose the Remove NIST Documents setting.
Note
Files that are filtered will not have any attachments, application metadata or text extracted from them. They will be available for reporting purposes only.
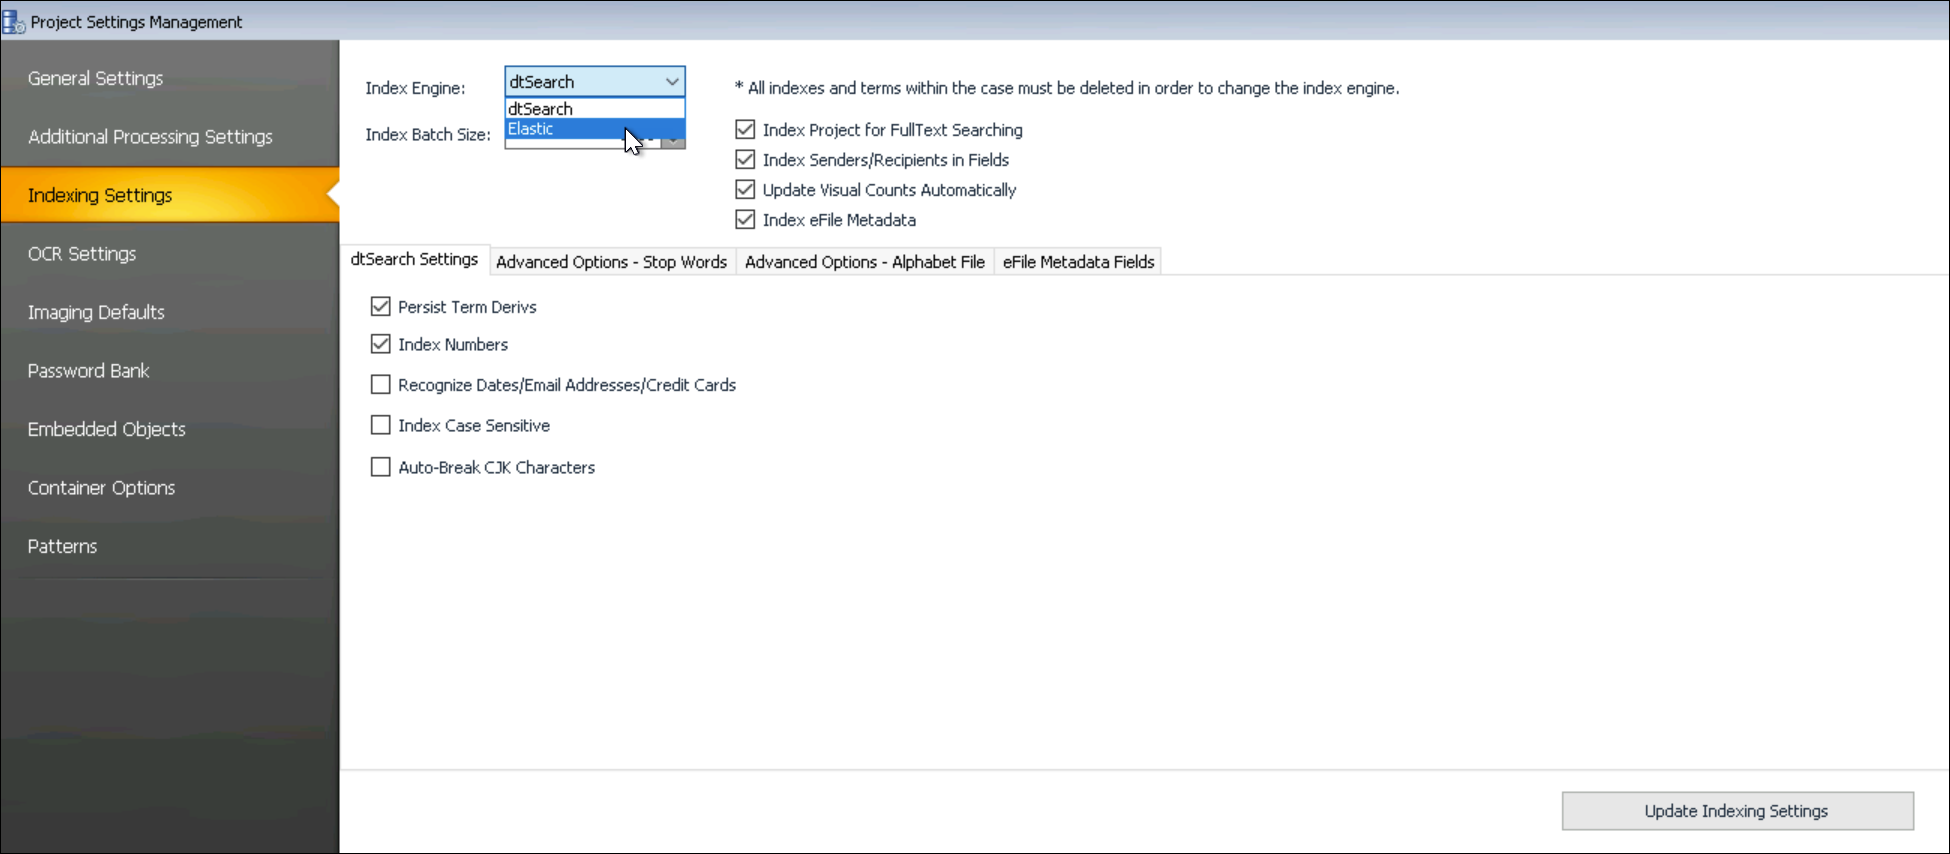
Indexing Options – All Indexing Settings can be altered after creating a project by clicking the Project Settings button; after making any necessary changes all imports must then be reindexed for the changes to take effect.

Index During Import – By default, a dtSearch Index containing the FullText of the imported files will be created during import. If the project does not require searching, or it is desired to Index at a later point in time, uncheck the Index During Import checkbox. If this setting is disabled or unchecked, it can be reenabled by selecting Index Project for FullText Searching under Project Settings > Indexing Settings at a later point in time, and a new Index can be created.
Note
By enabling Index During Import a field is added to the dtSearch Index named Text that contains the FullText of the file. To learn more, see Fielded Searching in Appendix F – dtSearch Syntax Guide.
Index Senders/Recipients in Fields – By default, the senders/recipients from imported email will be added as fields to the dtSearch Index during import. To only include the FullText of the imported files, uncheck the Index Senders/Recipients in Fields checkbox. If this setting is disabled or unchecked, it can be reenabled or checked at a later point in time, and a new Index can be created.
Note
By enabling this, 5 fields are added to the dtSearch Index for the Senders/Recipients of the email. To learn more, see Fielded Searching in Appendix F – dtSearch Syntax Guide.
Update Visual Counts Automatically - show indexing statistics as generated.
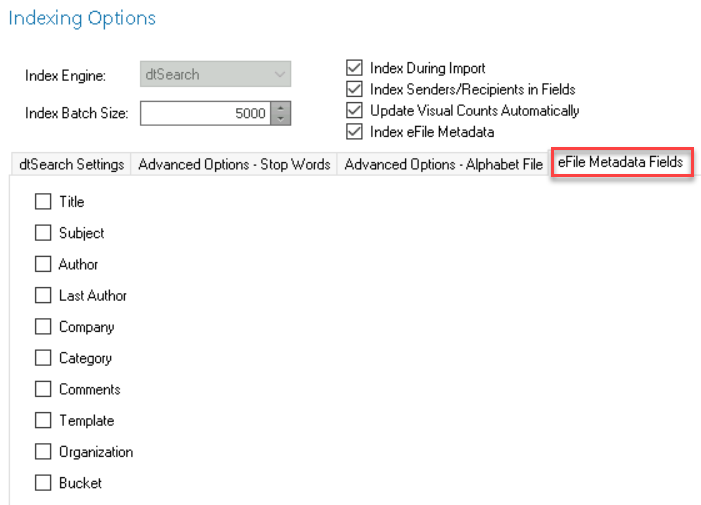
Index eFile Metadata - make electronic file metadata searchable. See eFile Metadata Fields tab below for more information on selecting fields to be indexed.
dtSearch Settings – Depending on the settings chosen, dtSearch Indexes will have different search behavior. By default, Index Numbers is turned on to Index numbers in the project. To enable other settings, choose the applicable checkbox. dtSteach is selected as the Index Engine under Instance Settings in the Environment Module.
Persist term derivs - When set, Term Derivatives will be persistent. This can be taxing for large projects. Do not use this setting unless necessary.
Auto-Break CJK Characters - Some Chinese, Japanese, and Korean text does not include word breaks. Instead, the text appears as lines of characters with no spaces between the words. Because there are no spaces separating the words on each line, dtSearch sees each line of text as a single long word. To make this type of text searchable, enable automatic insertion of word breaks around Chinese, Japanese, and Korean characters, so each character will be treated as single word.
Advanced Options - Stop Words – Index Stop Words are common words that are not indexed, thus they cannot be searched. To change the stop word list, add/remove a word to the default list. There can only be one word per line. If the Stop Word list is changed after indexing, the entire project must be reindexed for consistency.
Advanced Options - Alphabet File – The alphabet file can be manipulated to make special characters searchable. For more information on this, see Appendix F.
eFile Metadata Fields - Select which electronic document fields should be made searchable for this project.
Processing Options – Email – There are two settings in Processing Options – Email:
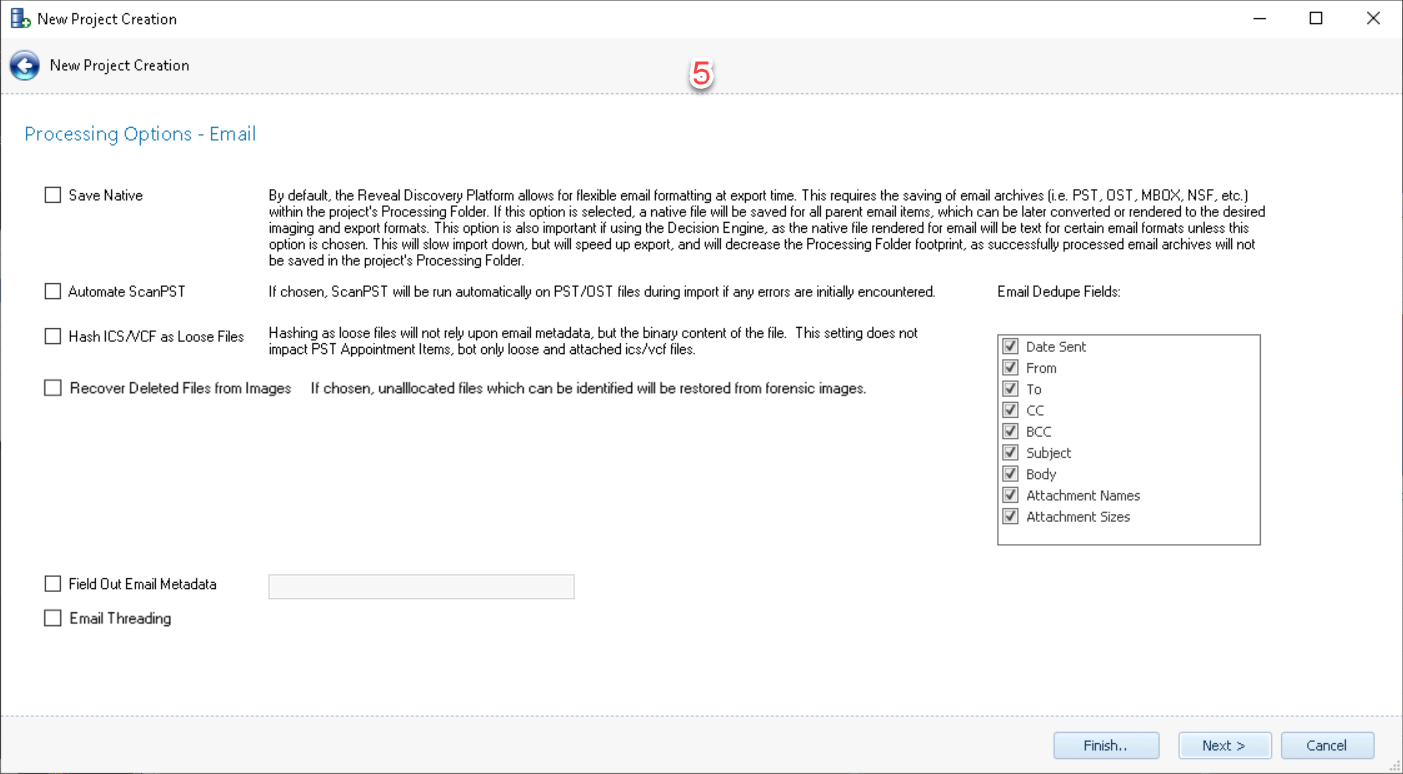
Save Native – If the Save Native option is selected, for source PSTs an MSG near native file will be created for all parent email items. This will slow import down, but will speed up export when exporting to MSG.
By default, source PST archives are saved within the project's Processing Folder. If this option is selected and the source PST is processed without errors, then the source archive will be deleted from the project's Processing Folder to save space.
Note
This option is for specific workflows where you're exporting to msg and reduced export time is more important than reduced import time.
Automate ScanPST - If selected runs ScanPST automatically if any errors are encountered during ingestion.
Hash ICS/VCF as Loose Files - Option to treat attached or otherwise PST non-appointment ICS and VCF files as binary files separate from email metadata. Hashing will include UTC StartDate/Time and EndData/Time data to maintain each item's hash integrity for deduplication.
Recover Deleted Files from Images - Will restore unallocated files which can be identified from forensic images if selected.
Email Dedupe Fields – By default, all settings are included when generating an MD5 Hash for email items. To exclude certain fields, uncheck the particular field(s) and that field will not be used when generating the MD5 Hash value for email items.
Field Out Email Metadata – This option will allow the user to provide search expressions to extract targeted extended email metadata into fields. The search expressions will be evaluated against all MAPI properties and any property which is a hit will be made available as an exportable field. Multiple expressions should be separated by commas.
Note
Searching MAPI properties can be unpredictable and can result in many additional fields added to the Project.
Email Threading - If the property is checked, the usual Email threading will run; if not checked, Email threading is set to OFF for the project.
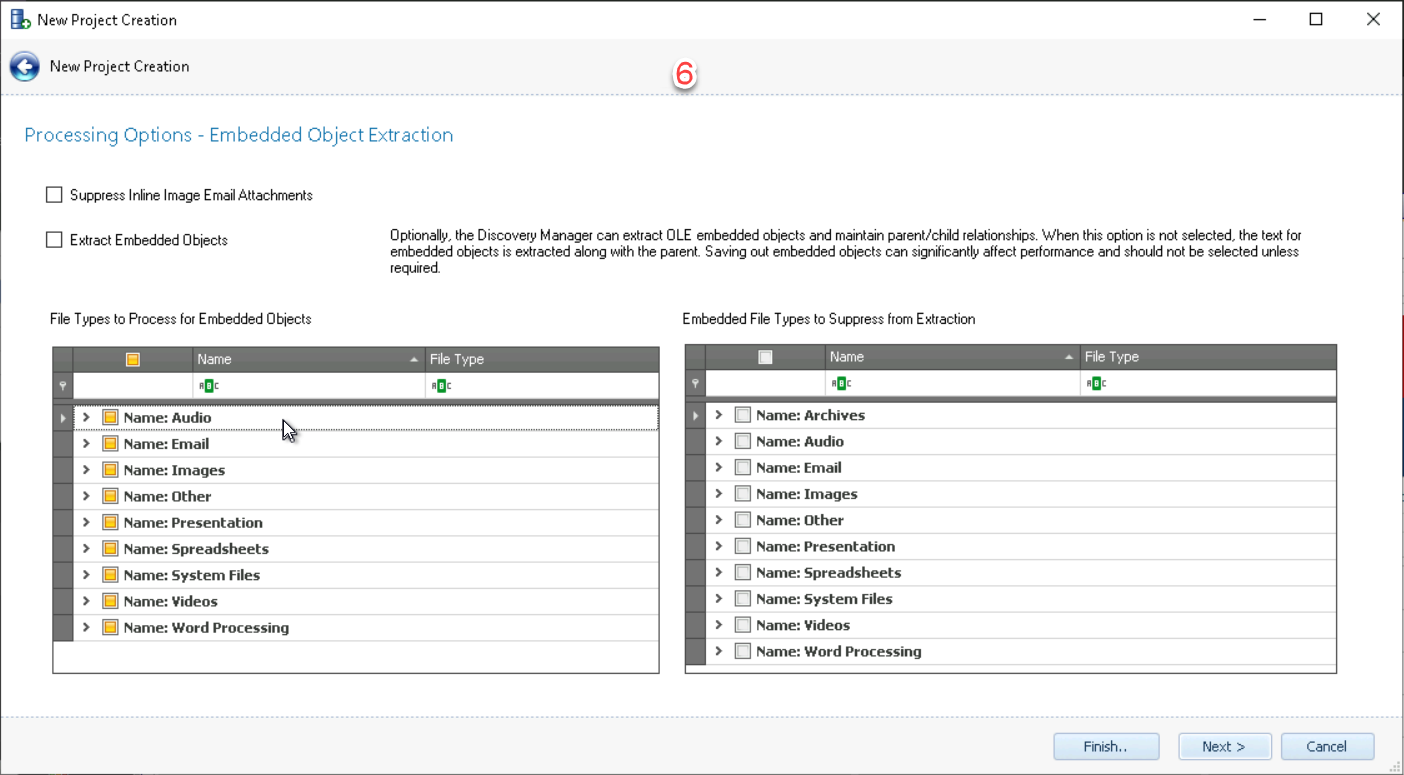
Embedded Object Extraction – There are two settings in Embedded Object Extraction:
Suppress Inline Image Email Attachments – By default, all inline attachments are extracted from the body of an email and given their own record as an attachment. If selected, this setting prevents processing from creating the attachment record and instead considers it a filtered file. The inline attachments will be added to the Filtered columns in the Project and Import Snapshots.
Note
Inline attachments are embedded in the body of an email. Examples of inline attachments are images within a signature line of an email, or any other item that is not properly attached to the email like a screenshot. If getting text for embedded screenshots through OCR is desired, this setting should not be selected.
Extract Embedded Object – Discovery Manager can extract embedded objects as standalone files and maintain the parent child relationships.
Note
Embedded object extraction should not be selected unless required. The user should test the specific settings before using it on a production project. It can have a significant negative impact on import performance and will add many additional records to the project.
Extensions - It is highly likely the embedded objects will not have an extension but where possible the extension is added for the extracted file.
Text Handling -
By default, all text for non-email embedded items is extracted and included in the parent item’s text. For example, if a parent Microsoft Word file has an embedded Microsoft Excel file, the text for the entire Word file would be extracted first, followed by the text for the entire embedded Excel file. The text for these files are combined into one text file.
However, if an embedded object is extracted to its own record, then its text will not be included in the parent item’s text.
To extract embedded objects as standalone files, check the Extract Embedded Objects checkbox and select the two following configurable settings:
File Type to Process for Embedded Objects –
This is the list of parent files that can be evaluated for embedded object extraction. Only file types selected in this list will be evaluated for embedded objects. The fewer items selected, the faster this process will be.
To remove file types from being evaluated for embedded objects, deselect the checkbox next to the appropriate file type. For example, evaluating images for embedded objects may not be desired. To remove all image file types from this process, deselect all checkboxes under the Images Super Type.
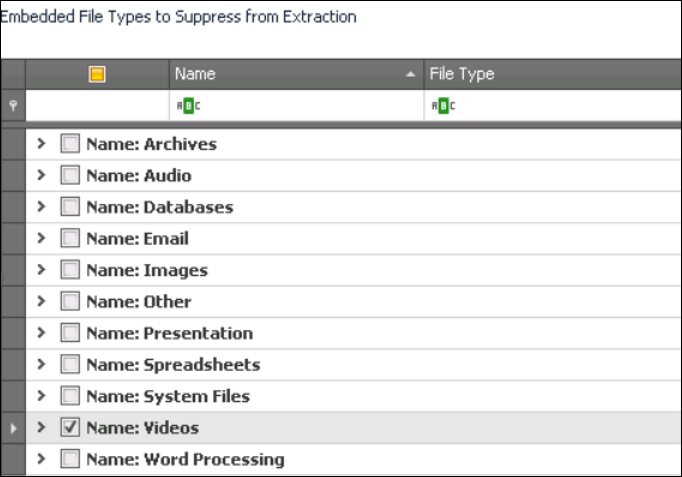
Embedded File Types to Suppress from Extraction –
This is the list of embedded object types that will not be extracted as standalone files. By default, all embedded item types are extracted from the items selected in the File Type to Process for Embedded Objects list.
To selectively exclude a file type as an embedded object, select the checkbox next to that item. For example, extracting video file types as embedded objects may not be desired. To exclude all videos from being extracted as embedded objects, select the Videos Super Type checkbox.
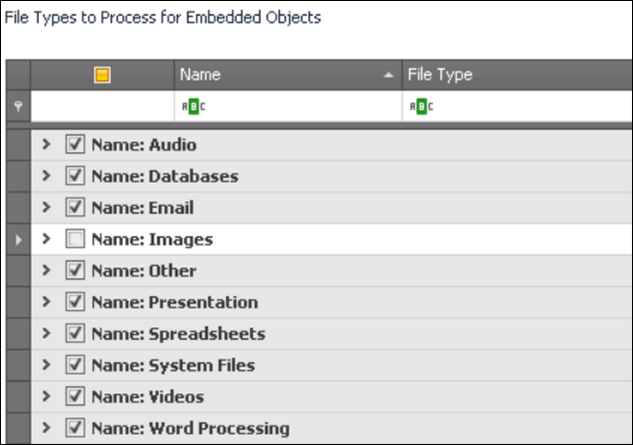
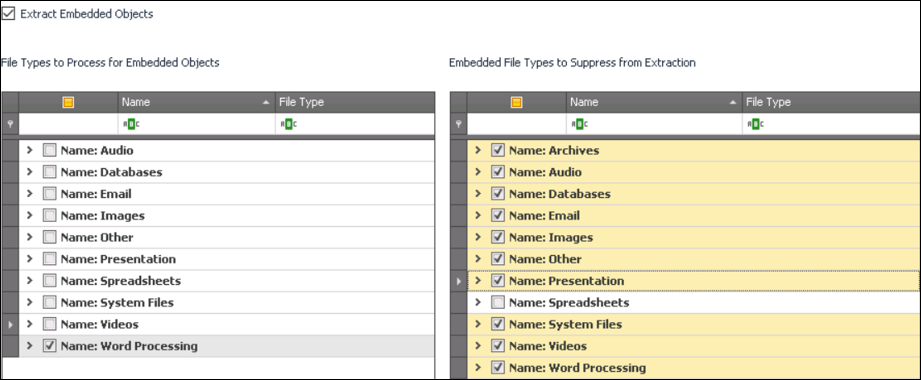
Example:
The below settings would only look within word processing files for embedded objects to extract. Of the embedded objects that are found within the word processing files, only embedded spreadsheets would be extracted.
Note
Both tables have all filtering capabilities contained within all grids in the application. One of the simplest ways to search for a file type is to type either in the Name or File Type column. For a complete listing of all capabilities please see Appendix G - Previews.
Processing Options - OCR – Discovery Manager can OCR files where electronic text could not be extracted. Any file where OCR has yet to be performed will be added to the OCR Pending OCR Status. Any file where the OCR process is successful will be added to the OCR Successful OCR Status. Any file where the OCR process has failed will be added to OCR the OCR Errors Index Status.
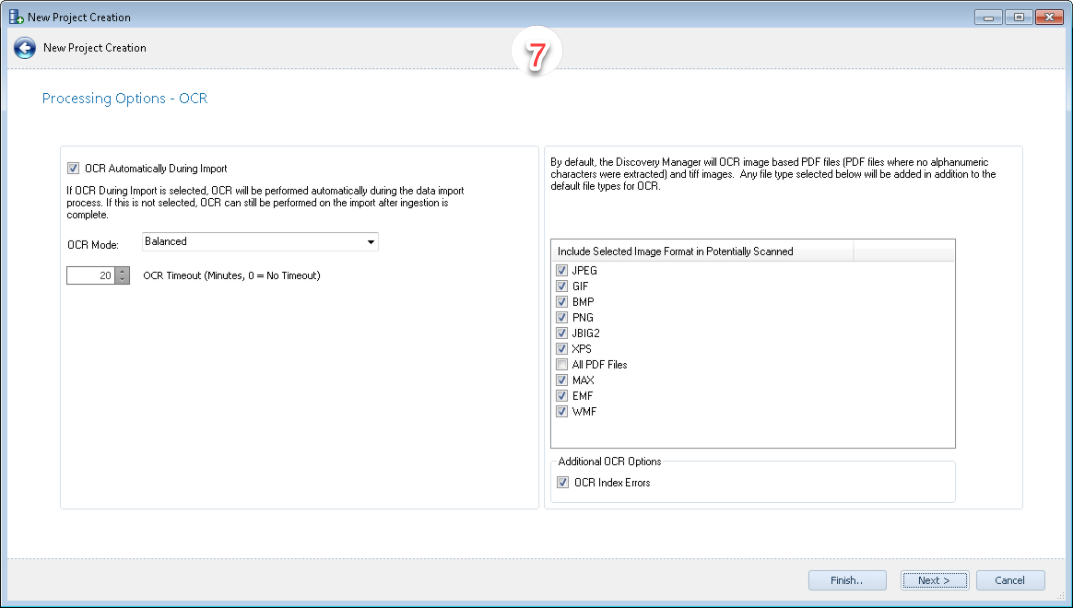
Optionally, JPEG, GIF, BMP, PNG, JBIG2, XPS, MAX, EMF, and WMF images can be included for OCR by selecting the applicable file type(s).
Optionally, all PDF files and Index Errors can be included for OCR.
Without selecting the All PDF Files setting, the only PDF files included for OCR are image-based PDF files, which are PDF files that have no alphanumeric characters in the extracted text. By selecting this setting all PDF files will be added to the OCR process.
Index Error files are files that have no text associated with them, but were properly recognized, not encrypted, and most likely not corrupt. To have OCR performed on these files select this setting.
OCR Language Support – Discovery Manager implements an auto-language detection that will automatically identify different languages and OCR in that language. If multiple languages exist within the same file, they will be recognized and processed properly as well.
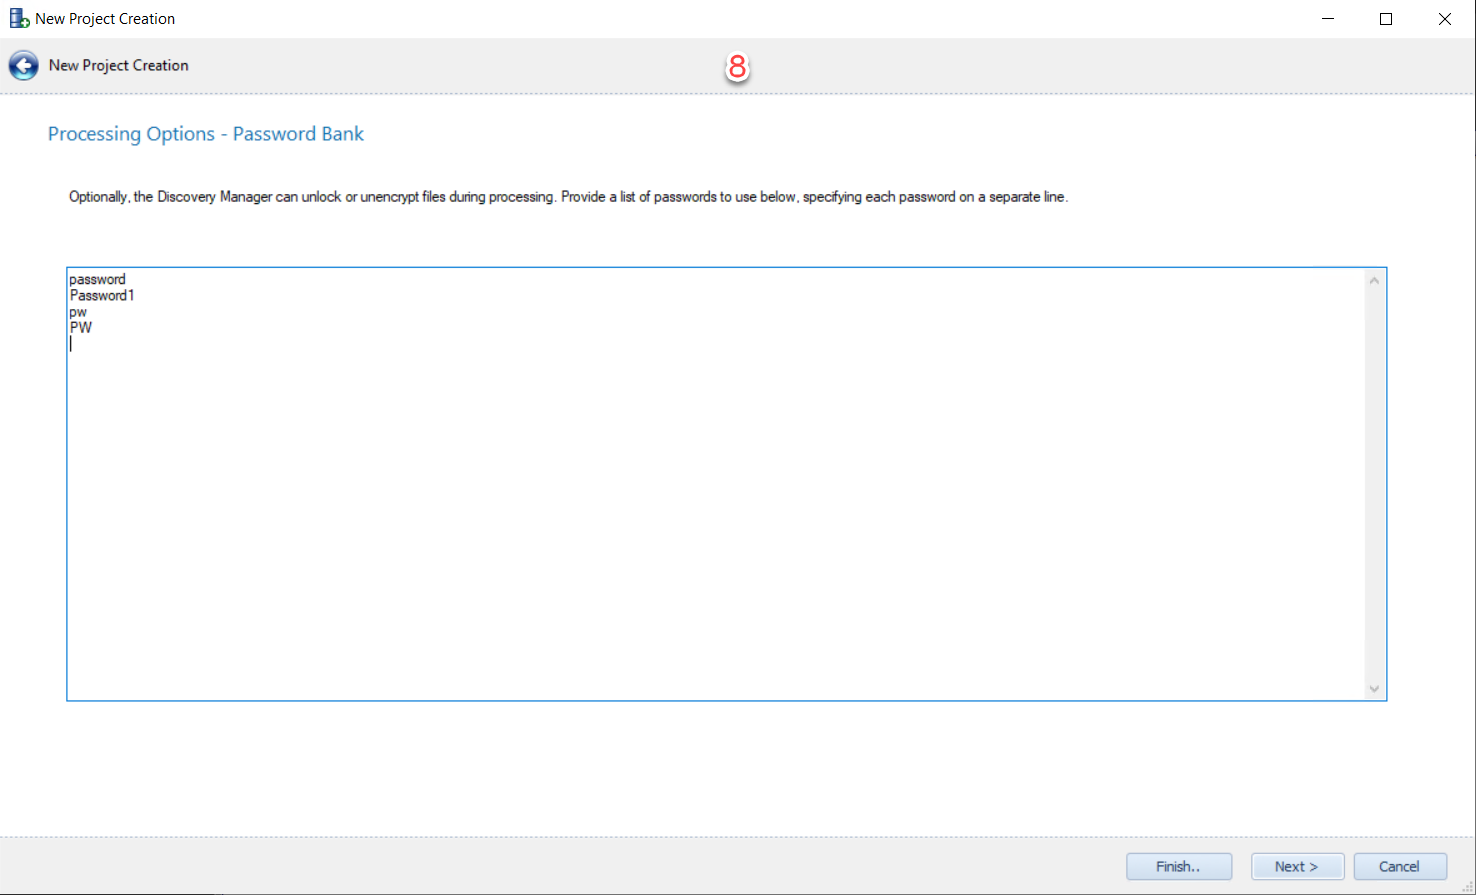
Password Bank – Copy and paste a list of passwords (one per line) into the Password Bank and those passwords will be used to decrypt the files identified as encrypted during processing. This process can also be performed after the data has been imported into Discovery Manager as described later in the section After Importing Data into a Project.
Note
This is not a brute force password cracking solution. It is recommended to receive a list of passwords from the custodian of the data, or the client. The number of passwords in the Password Bank will affect the speed of import and will be applied to imports moving for as part of the import process. It is highly recommended to keep the password bank within a range of 25 – 50 passwords maximum.
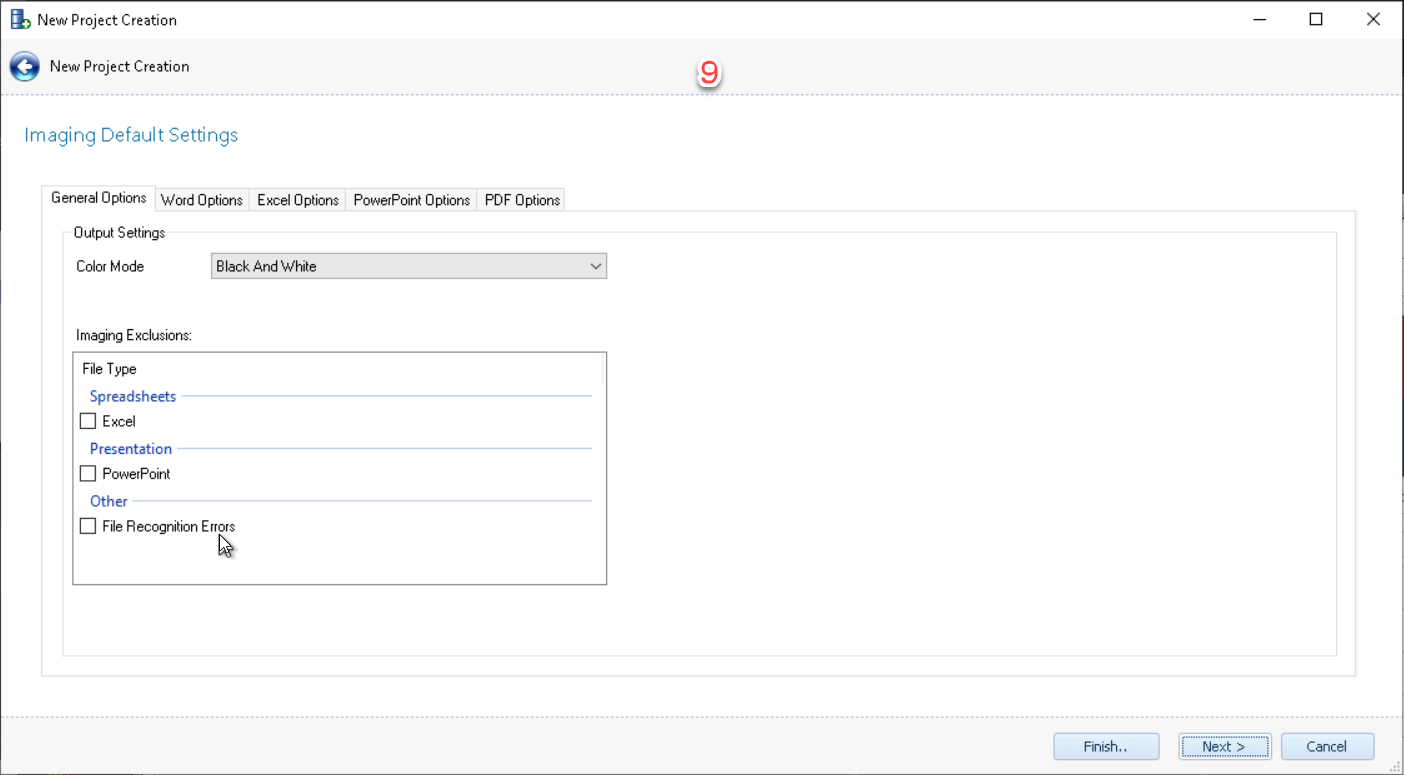
Imaging Default Settings – When imaging a set of data or creating an Imaging Job, several settings can be fixed depending on the file type. The settings chosen within the Project Creation Wizard will automatically be applied to the settings within the Imaging Module so they do not have to be reapplied when imaging a set of data. If needed, these settings can be changed after creating the project in both the Project Settings or within the Imaging Module itself. If these settings do change, the files that were imaged prior to the change will need to be reimaged for these settings to take effect. For more information about these settings, please see the Imaging Module section of this User Guide.
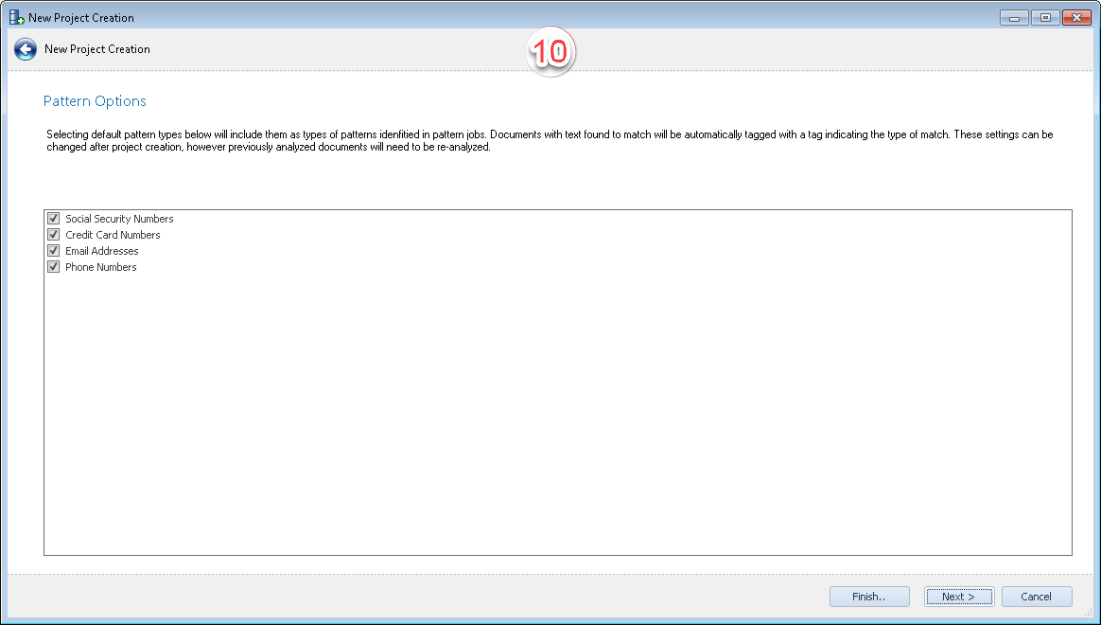
Pattern Options – One or more of the system defined patterns can be selected to find patterns matching certain personally identifiable information (PII) within a set of data. The patterns selected within the Project Creation Wizard will automatically be applied to the settings within the Analytics Module, so these settings do not have to be reapplied when finding patterns within a set of data. If needed, these settings can be changed after creating the project in both the Project Settings or within the Analytics Module itself. For more information about these settings, please see the Analytics Module section of this User Guide.
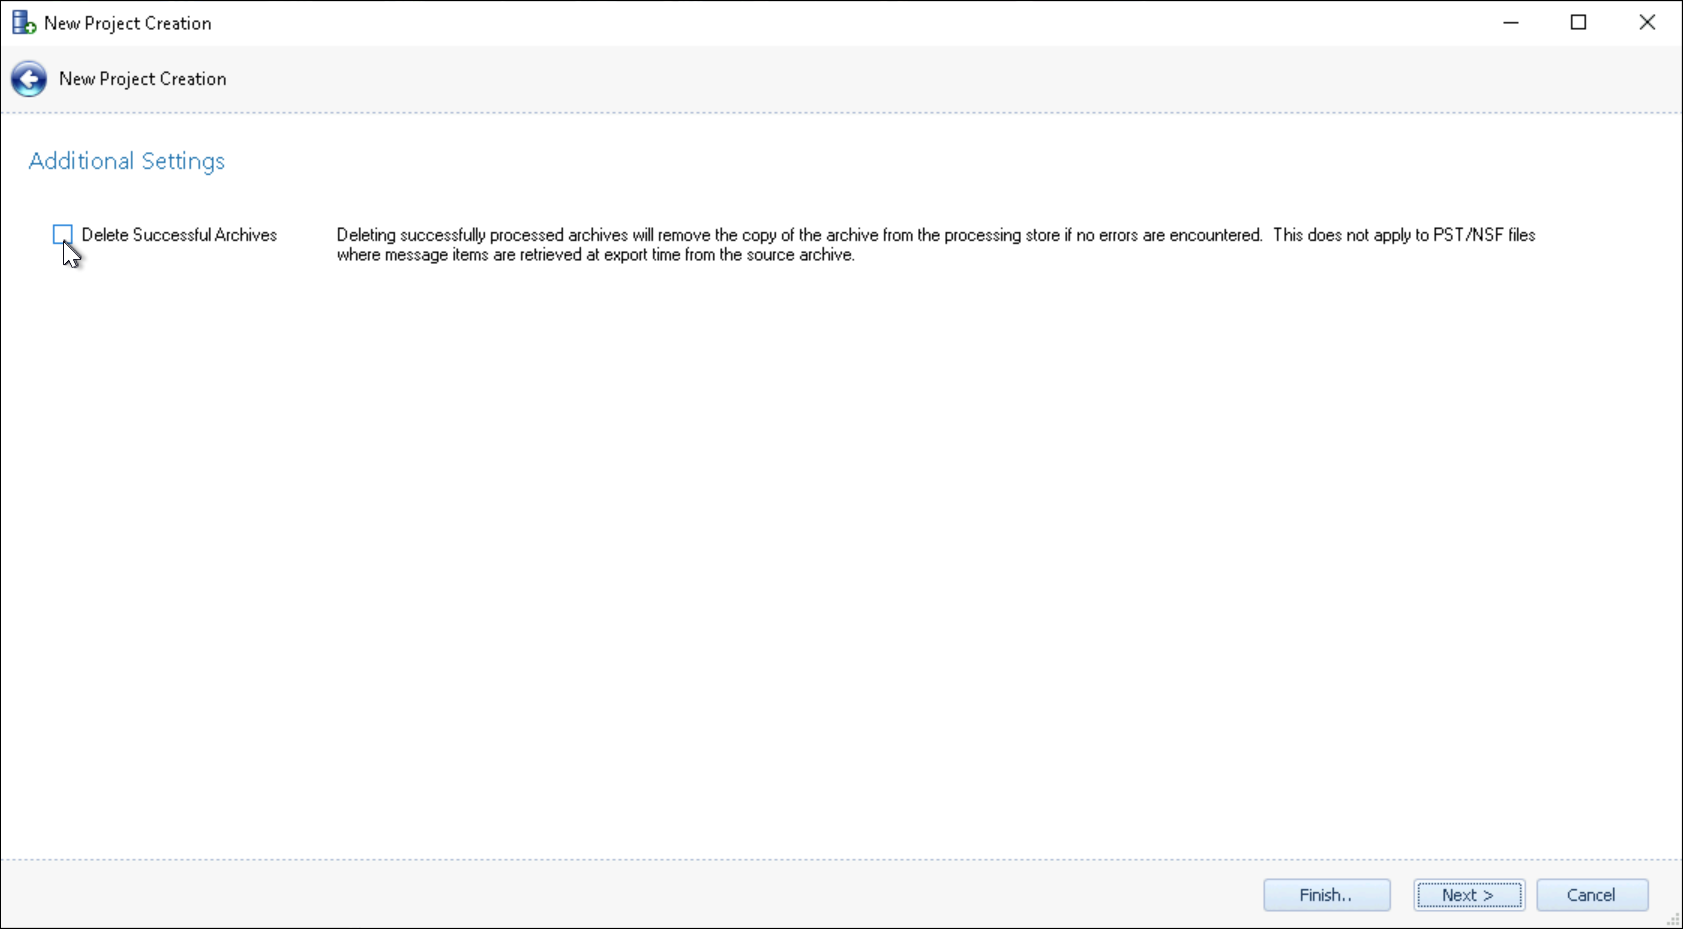
Additional Settings – Elect here to Delete Successful Archives, which means that if no errors are encountered in processing, the loaded data will be removed from the S3 file system to save cost. This does not apply to containers such as PSTs and NSFs, which are retained for retrieval of message items at the time of export. Once the project is created, this election may be made in Additional Processing Settings under Project Settings.
Note
This option is designed to save space by deleting source archives and is typically only used in an On-Prem environment. If selected, the source archives will be permanently deleted from the processing environment and will not be retrievable.
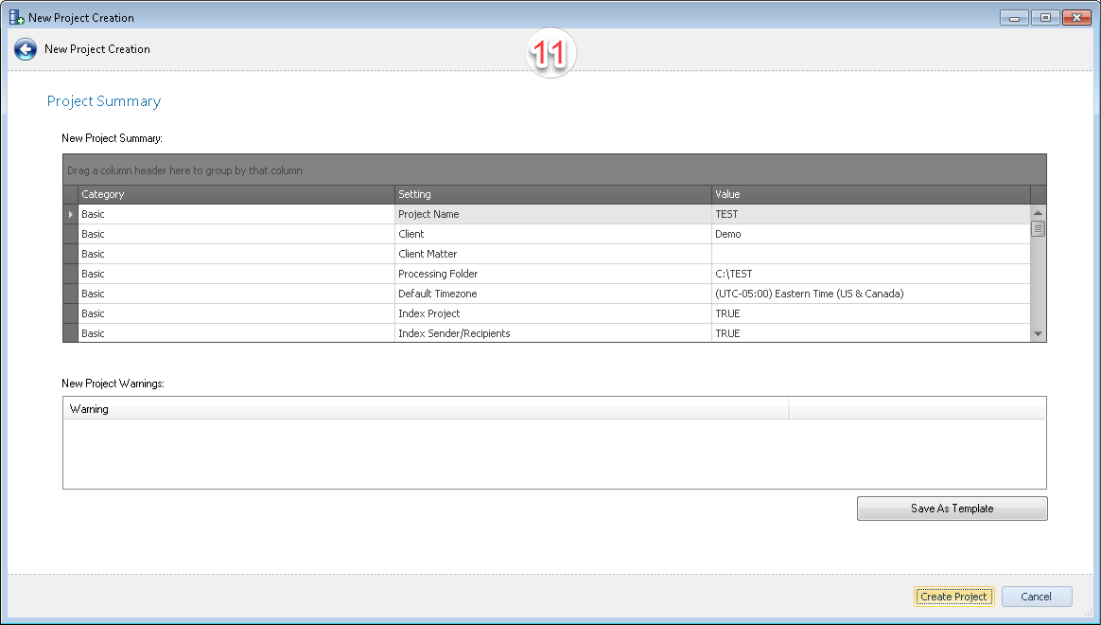
Project Summary – The Project Summary provides a breakdown of all settings chosen prior to creating the project. If a setting is incorrectly configured, click the back button located in the upper left-hand corner of the wizard, and change the applicable settings. A project created in an AWS Hosted workspace will add a Basic Category for Review Project (with value entered or None).
Project Post-Creation View
To open an existing project, navigate to the Projects Module Navigation, expand the client  the project is associated with, and click on the blue new project icon
  or green linked project icon to open. Once active, the project’s Snapshot will show in the Module Form. The Snapshot contains information about the project based on the Snapshot’s scope which is explained in the Snapshot Table below.
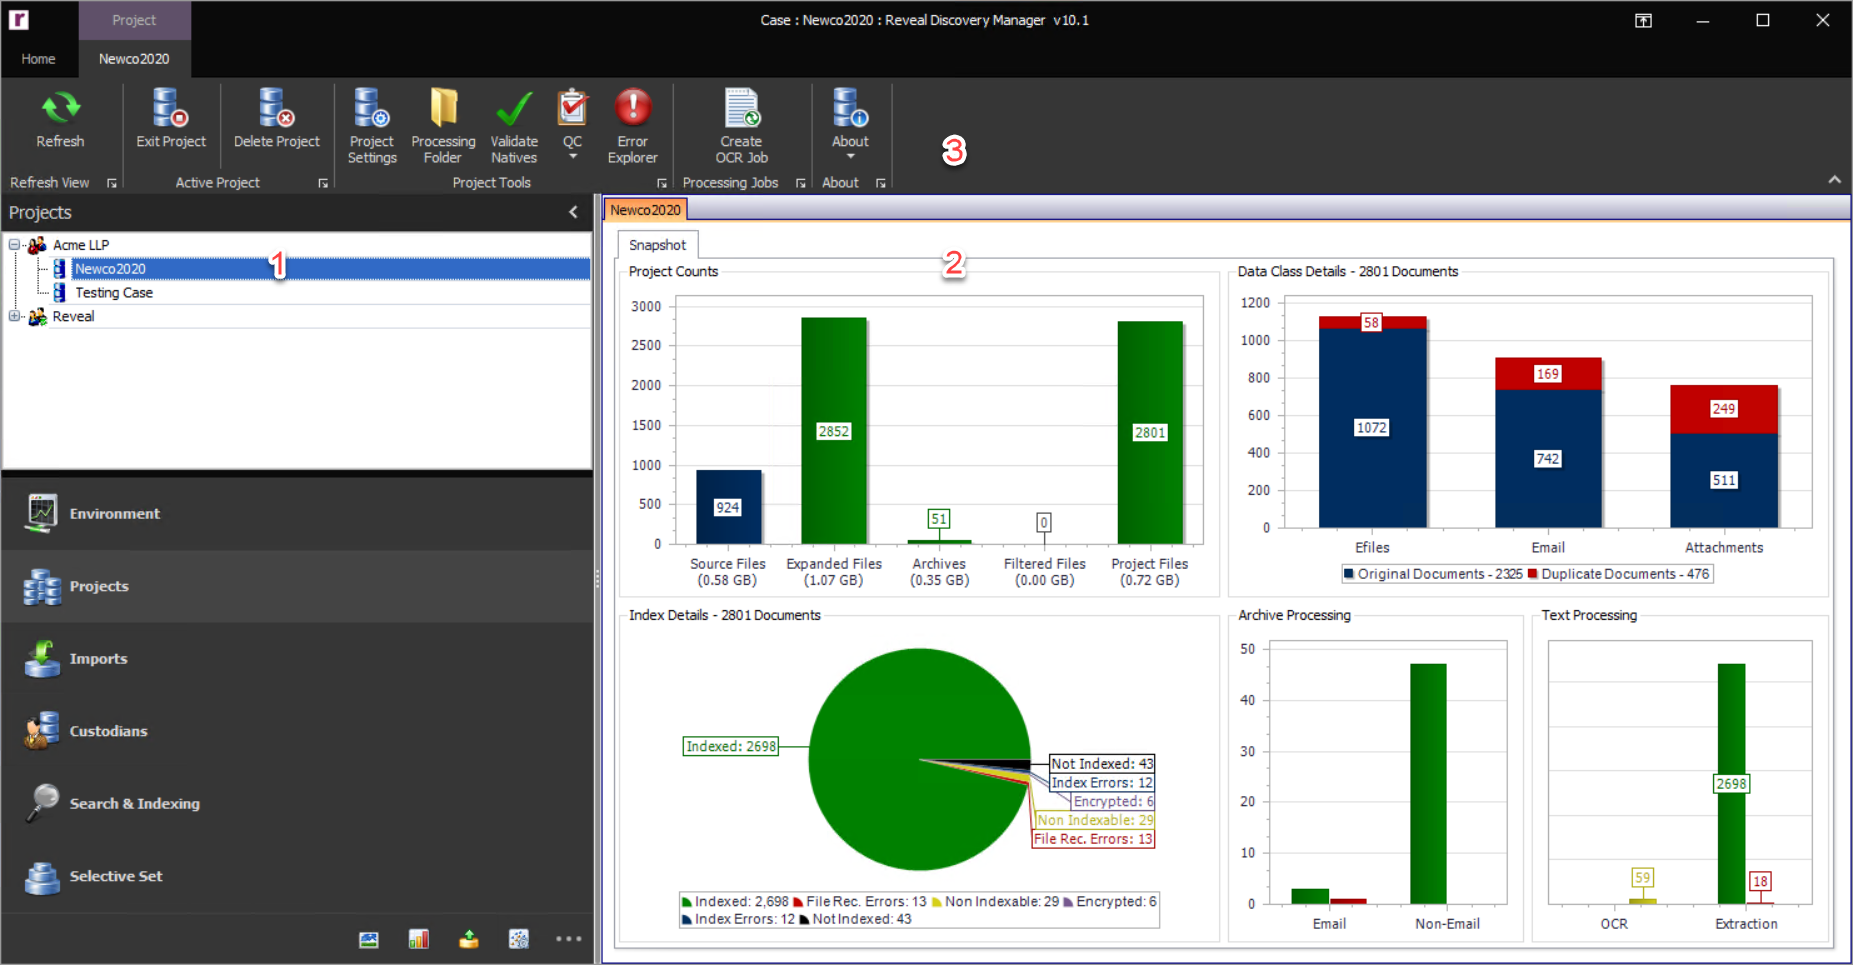
Active Project – An active project will be highlighted in blue in the Projects Module Navigation section and lets the user know which project they are currently working in. An active project linked to a Review case in the AWS environment will be highlighted in green.
Snapshot Charts – The Snapshot tab provides a visual high level snapshot of the project.
Project Counts – The Project Counts chart consists of 5 bar graphs. Each bar graph has the number of files and data size in gigabytes associated with each bar graph:
Source Files – This provides a one-to-one match of the uncompressed data imported into the project. In the above chart the Source Files is 924 which means there were 924 uncompressed files imported into the project prior to processing.
Expanded Files – Total number of files (source files and archive children) after processing prior to any data filtering.
Archives – Total number of archive files within the project.
Filtered Files – Total number of files filtered out of the project due to project level filters.
Note
Any inline email attachments that are suppressed when using the setting 'Suppress Inline Image Email Attachments' will be reflected in the filtered file count.
Project Files – Total number of files contained within the project after processing and filtering.
Data Class Details – A breakdown of original/duplicate efiles, email and attachments within the Project Files.
Note
Embedded Objects will be added to Attachments counts.
Index Details – The Index Details chart consists of the Index Status of the files within the project. A file can only have one Index Status. The individual files belonging to the various Index Statuses can be analyzed within the Selective Set Module.
Index Status – A file can only have 1 Index Status within a project.
Indexed – Total number of successfully indexed files within the Project Files. These are the files that are available for searching within the index. A file can have both electronic and OCR text. If the file has one or more of these text types, the file will be considered Indexed and one or both text files will be indexed for searching.
File Rec. Errors – Total number of unrecognizable file types contained within the import. These files will not be available for searching.
Non Indexable – Total number of files where text extraction will not be attempted as Reveal believes no usable text will be generated from these file types. For a complete listing of supported file formats please see Appendix B. These files will not be available for searching.
Encrypted – Total number of files identified as encrypted or password protected and that do not have text extracted. These files can be decrypted by using the Password Bank. Please see the Import Module for directions on how to do this. If these files are not decrypted, they will not be available for searching.
Index Errors – Total number of files where both text extraction and OCR has failed. These files will not be available for searching.
Not Indexed – Files that are flagged for indexing, but have not been indexed yet. For example, if the Index Project for Searching setting is disabled or deselected, all files that have not been indexed would belong to this Index Status.
Processing Details – A high level breakdown of the statuses of archive processing as well as text and OCR extraction.
Archive Processing – A breakdown of successful/errored email archives and non-email archives within the project.
Text Processing – A breakdown of successful/errored/pending (only for OCR) statuses of text extraction and OCR. Text extraction for electronic text will be executed for all files within the project that are not File Recognition Errors, Non Indexable, or Encrypted. If a file has electronic text as well as OCR text, both text files will be indexed for searching.
Projects Ribbon – After a project is active the following settings are available in the Projects Ribbon:
Refresh – Refreshes the Projects screen to show new projects created. This button can also be used within the project to update the Project Snapshot.
Exit Project – Exits the project; Discovery Manager remains open.
Delete Project – To delete a project first click on the project in the Projects Module Navigation and then click the Delete Project button in the Projects Ribbon.
Project Settings – The Projects button launches the Project level settings that were created at project creation time that can be changed or manipulated as required afterward.
Note
If the Indexing Settings are changed, the project needs to be reindexed for the new settings to be applied to the Elastic Index used in Reveal as may be selected under Indexing Settings. Other settings can be changed using simple SQL queries provided by Reveal Technical Support.
Note
Index Project for FullText Searching - This setting is functionally the same as the Index During Import setting under New Project. Checking it both enables automatic indexing when importing data, and a field is added to the dtSearch or Elastic Index (as selected) named Text that contains the FullText of the file.
Processing Folder – Launches directly to the project’s file system Processing Folder.
Validate Natives – Sometimes it is necessary to validate that the Processing Folder contains a proper copy of each native file. This may be necessary after a network failure, or when troubleshooting an import that has the Missing Files icon. After this button is clicked, if a file is missing in the Processing Folder the File ID and the path to where the native file is supposed to be will be logged.
QC – To launch a global view of Import QC or Image QC, click the QC button and choose the appropriate option.
Error Explorer – Shows the Errors table for the project.
Create OCR Job – Allows user to create and manage OCR Jobs. These jobs can be created by using Imports, Selective Set, or Imaging Jobs as the scope of the OCR Jobs. To create an OCR Job, choose the scope, and click the Create Job button. This job can be monitored within the Processing Jobs tab within the Environment Module.
Re-OCR Errors – For any scope where OCR has been attempted, there could be errors. These OCR errors can be reattempted by selecting the Re-OCR Errors setting, choosing the job previously processed for OCR, and clicking the Create Job button. This job can be monitored within the Processing Jobs tab within the Environment Module.
Note
All OCR settings in the Project creation are determining which native files to OCR. Users also can distribute Imaging Jobs for OCR.
About – To get project specific information like Project Version, Processing Folder, and Project ID, click the About button.