APPENDIX G - Previews
Within the Search, Selective Set and Imaging Modules, users can Preview the work product created within that module. This is a great way for users to quality check or investigate their data further. Once an item is selected in the module, clicking Launch to Preview on the module ribbon will open the Preview window. The following explains how to use Preview once it has been launched.
Preview Navigation and Grid Technology
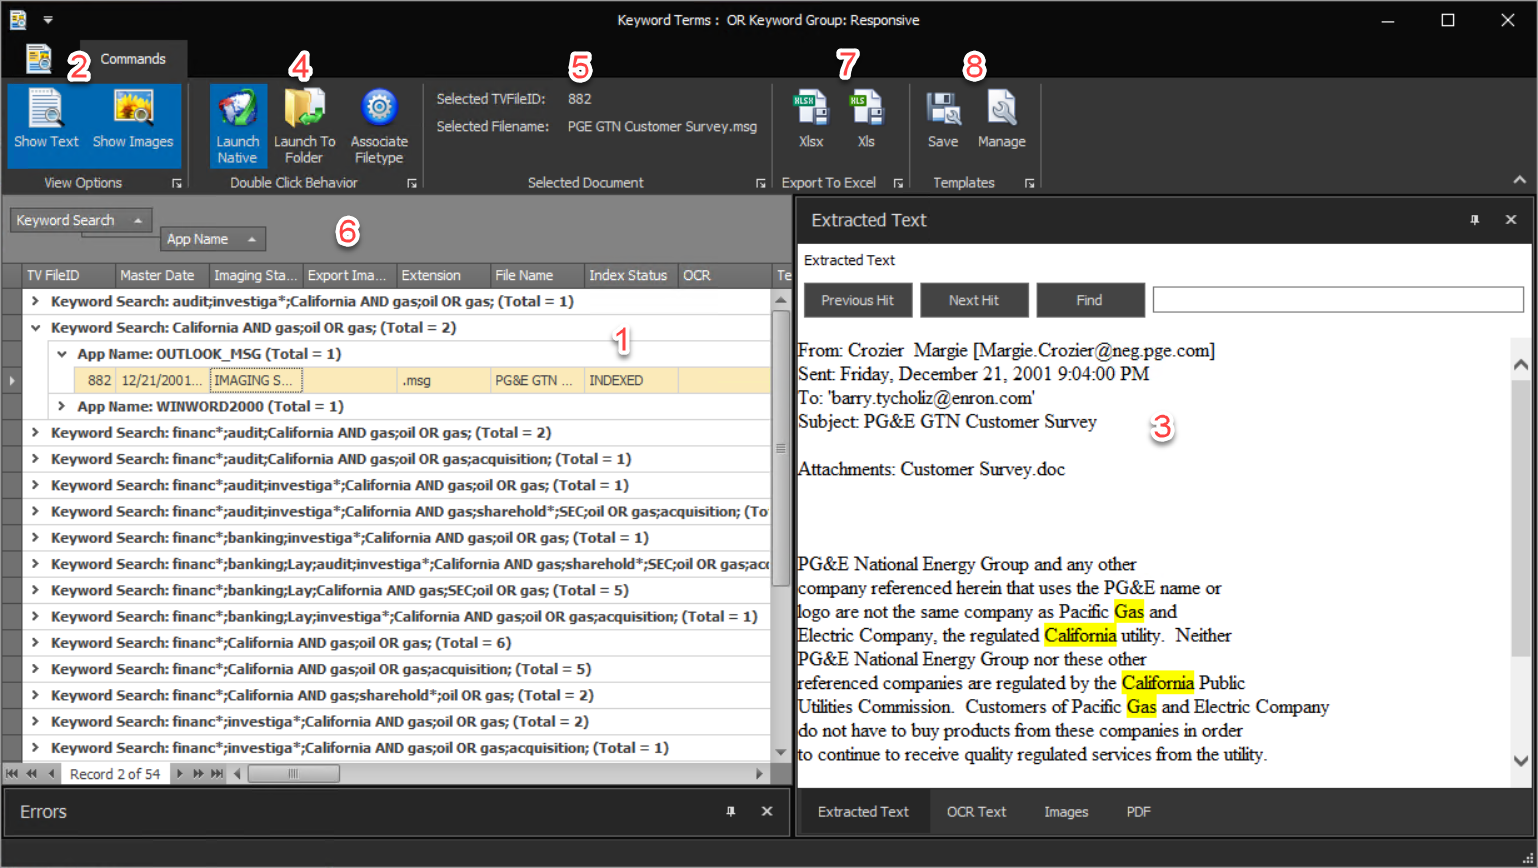
Preview Table Navigation – To view the results of a file in the Preview, click on a row in the table and the file’s text will be displayed in the text viewer. The up and down keys can be used to go from/to the previous/next file in the Preview.
View Options – The View Options setting dictates what will be displayed within the Viewer. By default, both the text and images (where applicable), will show for a given file within the viewer. To turn off the display of either or both settings, click on the Show Text and/or Show Images buttons.
Viewer – The viewer within Preview consists of these viewers, accessed via tabs at the bottom of the Viewer pane:
Show Text – The text viewer displays both the Extracted Text and OCR Text tabs side by side, and will automatically highlight any search term(s) found in the selected file. To navigate between hits click the Previous/Next Hit buttons.
Find – To search the file for a term that has not been added to the project, type the term into the Find textbox and click the Find button. The Previous/Next Hit buttons can be used to navigate between hits.
Note
To clear this term from the Previous/Next Hit navigation, remove the term from the Find textbox and click the Find button.
Show Images – If the file has been imaged, the images for the file will be displayed.
Show PDF – A PDF document may be opened and viewed here.
Double Click Behavior – The double click behavior defines what will happen when a user double clicks on a row within the Preview table. There are three settings, only one of which can be used at a time:
Launch Native – This is the default setting. When a user double clicks on a row within the Preview table, it will launch that file to the native application associated with its file type within Windows.
Launch To Folder – To launch file in the Preview table to a folder in order to get a working copy of the native file, select the Launch To Folder button and double click on the row within the Preview table.
Associate Filetype – If it is preferred that the file launch to a different application when launched natively, select the Associate Filetype button, double click on the row within the Preview table and change the file's association within windows from the default application. This is used when an alternative application is found that is preferable to the default for viewing the native file, for example associating a Word file viewer rather than the full Word application to prevent inadvertent edits.
Selected Document – The Selected Document section within Preview provides the file’s Discovery Manager FileID as well as the file name of the file that is selected within the Preview table.
Preview Table Settings – Preview table columns each have a filtering option as well as click to sort when the pointer glides over the column heading. To see all of the Preview table's available settings and options, right click on the table column headers and the following form will appear:

Sort – To sort the table by a particular column, click the column header, or right click on the column headers and choose Sort Ascending or Sort Descending.
Group By – To group the table by a particular column, drag and drop that column above the column headers, or right click on the column headers and choose Group By This Column. To clear a grouping right click next to the field the table is grouped by and choose Clear Grouping.
Column Management – To add or remove columns or fields within the Preview table, click Column Chooser and a listing of all available fields will be displayed in a Customization box. To add the field in the Customization box as the last field in the table, double click on the field. To add the field to a certain location in the table, drag and drop the field from the Customization box to the desired position in the Preview table.
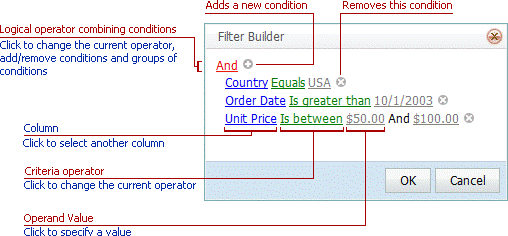
Filter Preview Table – To filter the Preview table, click on the Filter Editor and the following form will appear:
Export To Excel – To export the Preview table to an Excel file holding its groupings, counts, and columns, click the Export To Excel button.
Note
There is a grouping expand/collapse navigation within the Excel file. To use this navigation, open the Excel file and notice the numbers in the upper left hand corner next to the column A. This number will correlate to the number of grouping within the Preview table. For example, when exporting the Processing Exceptions -> File Exceptions this navigation will look like
 when it is opened. If ‘1’ is selected, all groupings will be collapsed to the top level, and so forth. Alternatively, the
 buttons can be used to expand/collapse individual groupings within the Excel file.
Templates – Templates provide the ability to save the current Preview settings, including selected fields, field groupings, etc., on the project and global level. This feature coupled with the Export To Excel feature allows users to create customizable reports. There are two buttons associated with Templates that manage these features:
Save – To save the current Preview’s settings, click the Save button, give the template a name, choose the Project Scope (Project to save the template only within the project, and Global to save the template across projects), and click Save.
Manage – To load a previously saved template, click the Manage button, choose the template, and click the Load Template button.