Export Module
The Export Module creates, manages and deletes exports for the project. There are six main types of exports: Parent/Child, Natives Only, Overlay, Review (Append), Review (Overlay) and Australian Protocols.
Parent/Child Export - creates a numbered native file, a DAT file entry containing the fielded metadata, and text for each file within the export. Additionally, Parent/Child export jobs can export numbered images per native file if the file has been imaged. These images can also include custom placeholders and endorsements if required prior to production. These export types are typically loaded into review platforms for further review.
Natives Only Export - will export all files in their native format as well as native folder structure. Email will be exported back into its native format meaning attachments will not be broken out as separate files. Export Settings are limited in a Natives Only Export, and a load file cannot be created. A Natives Only Export is typically used in the scenario where the resulting export is to be loaded into a different eDiscovery tool. It may be desirable to link certain information from Discovery Manager into the eDiscovery tool such as the search terms responsive to a certain file. To link this type of data and more, generate the Export Detail Report which contains this type of information and use the MD5 field to link efiles/attachments and the Exported Entry ID to link parent emails.
Overlay Export - will display the Exports tab as the only available Export Set. This Export allows for the recreation of the data from the previous selected Export for use as an Overlay in a downstream application. This is typically used when a field was not chosen at export time for a Parent/Child Export. When the field FILEID is chosen with an Overlay Export, the numbering used at export time will be replicated in the resulting load file.
Review (Append) - sends the export as fresh documents to the Review project. In an Early Case Assessment (ECA) workflow, this efficiently packages and pushes documents for triage in Review.
Review (Overlay) - updates a Review Export with additional or updated information, its scope limited to a prior Export (in general, augmenting a Review (Append) export job).
Australian Protocols - Australian production formatting prescribes specific components for numbering at the Page Level or at the Document Level. For more information on this selection, see Australian Numbering Protocol.
When an export has successfully been generated out of the project, the export is represented in the Module Navigation with the  icon. If an export has any errors when exporting out of the project, the export is represented in the Module Navigation with the
  icon.
icon.
Creating an Export - Export Settings
New Export – To create an export click the New Export button.
Note
NOTE that I have collapsed the ribbon in this illustration to display more vertical screen information.
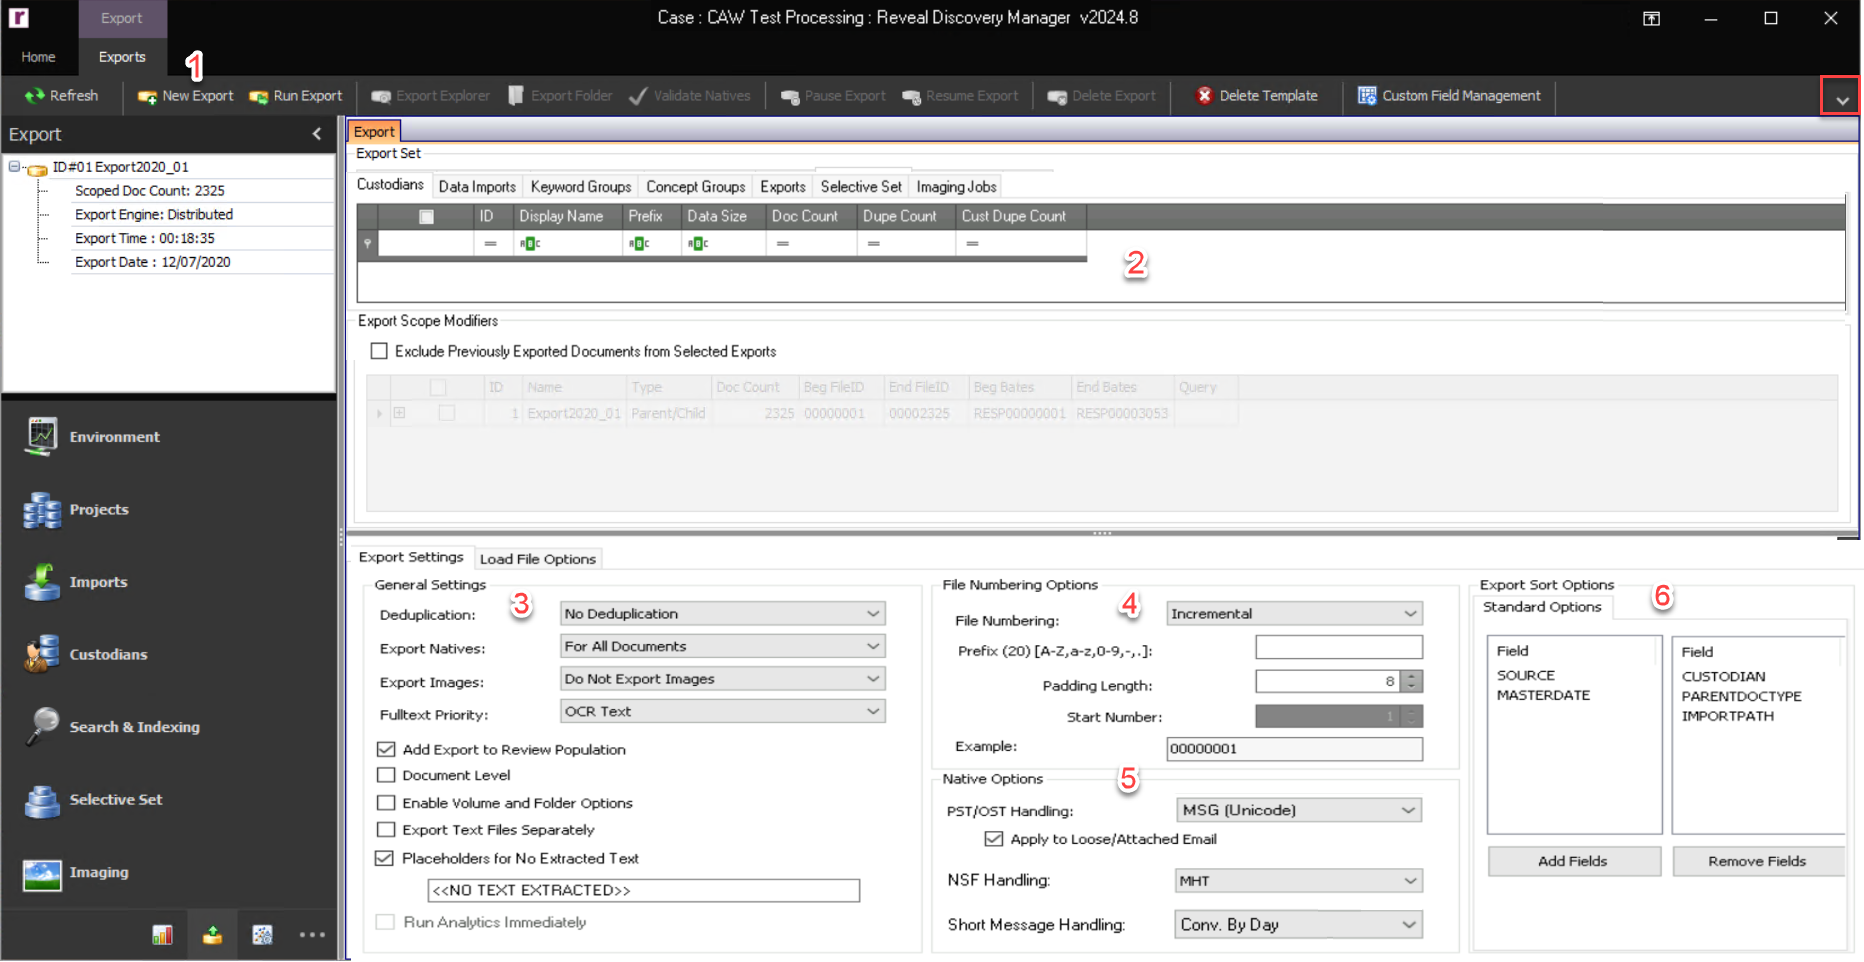
Export Set – Each tab contains data subsets created within the different modules. Select one or more items within any single tab by clicking the item’s checkbox
 . If multiple items are checked within one tab they will be combined with the OR operator. To select multiple items across multiple tabs, a Selective Set will have to be created and selected to generate the export.
Note
When selected as the Export Type, a Production Export will only display 1 available Export Set which is otherwise a hidden tab named Productions which contains all locked productions.
Export Settings– Below are the available Export Settings.
Export Name – Supply each export a name by typing in the Export Name text box. The first folder of the export will have this name.
Note
When the Export is executed, a folder will be created using this name at the Export Base Path provided in the Project Settings for the project. If this has not been changed, this path will be ProjectProcessingFolderPath\Export\ExportName.
Type – Choose one of the six export types. For more information about these export types, please see above.
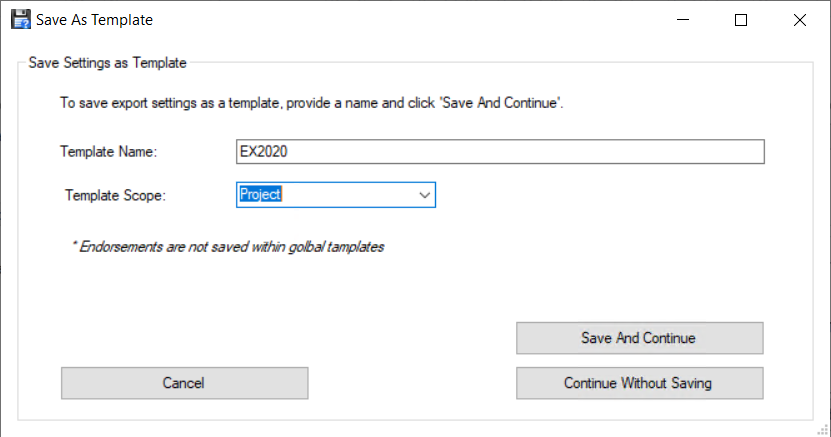
Template – Saved Export settings may be selected here. Otherwise, after choosing all Export Settings and clicking the Run Export button the last step when performing an Export is the Save As Template form. After entering a Template Name, all Export Settings chosen for this job will be saved for future exports. To recall this template for a future export, click the
 drop-down and choose the applicable template.
Note
To choose a template from another project, check the
 checkbox and any export template that was saved as a Global Template will be populated in the drop-down menu.
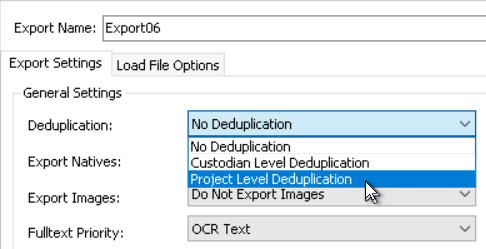
Deduplication – This setting dictates the duplicate handling that will be applied within the export. Choose between No Deduplication (default), Custodian Level, Project level, or a custom Dedupe Scope (defined below). To change the Deduplication handling choose one of the following settings from the drop-down menu:
No Deduplication – The export generated will include original and duplicate files with the file count.
Custodian Level Deduplication – The export generated will only include the original files within the applicable custodians.
Project Level Deduplication – The export generated will only include the original files within the entire project.
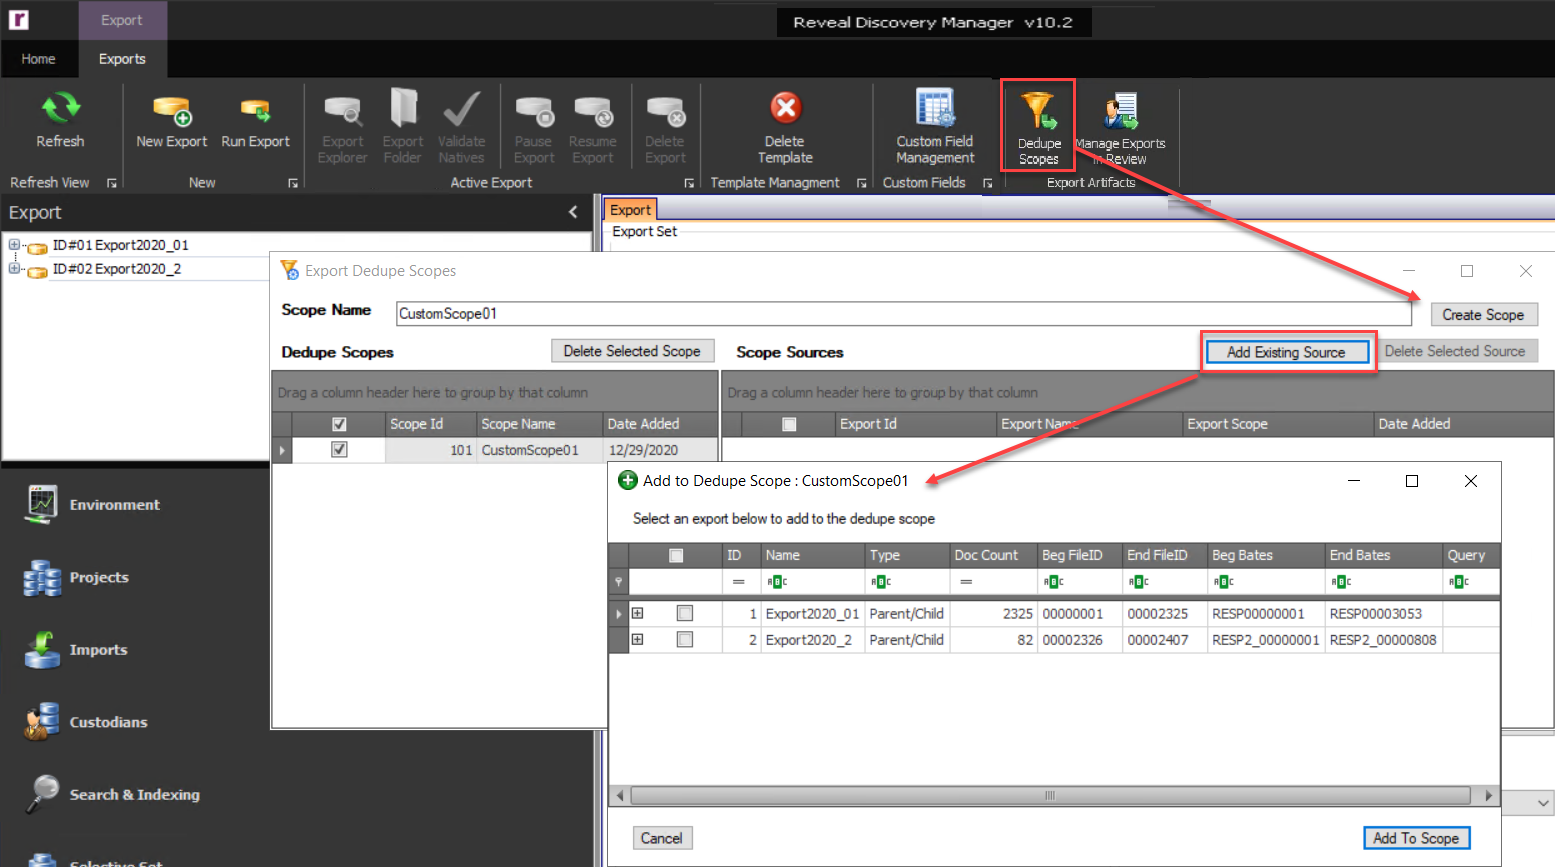
Dedupe Scopes - The Dedupe Scope tool allows a user to define a custom set of documents that will be used as the deduplication population, both for exporting and for reporting purposes. This is accomplished by specifying prior exports, which will be the subset of documents that are used to deduplicate against.
NOTE: Custom Dedupe Scopes can change the precedence of master documents within the export such that the deduplication is not entirely dependent upon the order of load within a project or custodian.
Click Dedupe Scope in the Export Module ribbon to define a custom deduplication scope.
Enter a Scope Name and click Create Scope.
Check to select the new Dedupe Scope in the left-hand table below.
Click Add Existing Source to pop up a table of prior exports; each may have one or more Custodians or other criteria in its scope.
Select one or more Source examples.
Click Add to Scope.
The custom Dedupe Scope is now ready to be applied using the combined criteria from the source examples supplied.
Note
If a custom Dedupe Scope is not defined, the Deduplication Order is based on order of time the file was processed.
Manage Export in Review - The Manage Exports in Review function tracks each Export Set and the identifying numbers of the files within the Export Sets (File ID). This is necessary, because a single document can be exported multiple times, each with a different exported File ID.
When an Export Set is moved to the right of the popup, the files within it are considered to be "In Review". If an overlay export is attempted, Processing checks to see if any TVFileIDs in the current export job exist within the "In Review" Export Sets. If so, it can then match the files' TVFileIDs with their appropriate exported File ID.
Add Selected Exports To Review
Remove Selected Exports From Review
Note
If running a Review (Append), Manage Exports in Review attempts to alert the user if the same record is being exported to the same Review Project multiple times. If there is overlap between documents previously exported to Review and the documents in the current export, it will warn the user.
Export Natives – By default, all native files are exported within an export. To suppress native files from an export, click the
 drop-down and choose For No Documents, and native files will not be exported.
Export Images – By default, no images are exported within an Export. To export images, click the
 drop-down and choose one of the following options. If an image does not exist for a given file, an Image Placeholder will be used.
Single Page Tiff – Exports Single Page Tiff Images.
Multi-Page Tiff – Exports Multi-Page Tiff Images.
Searchable PDF – Exports Searchable PDF files.
Fulltext Priority – A file can contain electronic extracted text and OCR text. By default, the OCR text will be exported out for a file first. If using the electronic extracted text instead of the OCR text is desired, choose Extracted Text.
Add Export to Review Population - Pushes all documents in the current export to "In Review" status, as described and managed under Manage Export in Review above.
Document Level – By default, families are never broken in exports. To export files without their family members, click the checkbox Document Level.
Enable Volume and Folder Options – To control the Export volume foldering, numbering convention, sizes, and maximum number of items per folder, click the checkbox Enable Volume and Folder Options, and the Volume and Folder Options tab will appear. To see more information on these settings, please see below.
Export Text Files Separately – This setting will export a separate text file named after the FILEID per native file containing the extracted text for the file from the FULLTEXT field. The text files and a load file will be placed at the root of the Export folder in a folder named TEXT. The load file will contain the FILEID and the path to the exported text file. Check to select this setting
 .
.Note
This setting will typically, be used in place of adding the FULLTEXT field to the load file. If this is the case, make sure the FULLTEXT field is not one of the Selected Fields in the load file.
Placeholders for No Extracted Text – This setting will add the value <<NO EXTRACTED TEXT>> in the DAT file or the separate text file for the files where there was no extracted text. This is for all files that do not have the Index Status of Indexed.
Placeholder Text – Allows a user to edit the placeholder text for files with no extracted text.
Run Analytics Immediately - AI Sync will be run immediately, instead of the default 60 minute wait period.
Creating an Export - Numbering, Native and Sort Options
File Numbering Options – This setting only applies to Parent/Child or Production exports and dictates the file numbering within the export. The number used will be applied to the resulting native file, text file (if the setting Export Text Files Separately is chosen), and all FILEID related fields within the load file.
Incremental – This setting will add a generic number scheme throughout the life of an export for all files exported starting with the number 1. This setting will automatically pick up on the next available number for all future exports. For example, if the last number used in the first export was 00000391, the next import will automatically start with 00000392.
Note
If the last export is deleted from the project, the next export will use the starting number that was contained within the export that was deleted. For example, if the last export created was deleted and started with the number 00000001 and ended with the number 00000391, the next export will start at 00000001. This is only possible when the last export is deleted from the project.
Custodian Prefix Incremental – This setting will add a numbering scheme throughout the life of a project for all custodian files contained within the scope starting with the number 1 concatenated with the Custodian Prefix assigned at Custodian creation time. For example, when creating the Custodian DOE, JOHN C. the Export Prefix used was JDOE-, so the first number used for a file exported from DOE, JOHN C.’s universe will be JDOE-00000001. This setting will automatically pick up on the next available number for all future exports. For example, if the last number used in the first export was JDOE-00000391, the next import will automatically start with JDOE-00000392.
Note
To reset the Custodian Prefix Incremental numbering at 1, change the Export Prefix field by editing the custodian within the Custodians Module or deleting the previous exports.
Custom Incremental – This setting will add a numbering scheme to the specific export starting with the number prefix followed by the number entered at export time. Unlike the two previous numbering formats, this will not automatically continue from the previous export’s numbering.
Prefix – The prefix is the first sequence of the numbering scheme. It will remain constant and appear on each image. The following settings are available for the prefix as well.
Padding Length – This controls the number of characters after the prefix. By default, this is set to 8 characters.
Start Number – The first number applied to the first image in the export set.
Example – The example of how the image numbering will look on the image.
BEGBATES – This setting will name the native files after the BEGBATES of the file. This setting is only available when exporting images out within the same export.
Native Export Options – The following settings are available for Native Options for an export:
PST/OST Handling – This setting dictates the email handling for Outlook email items within PST/OST files. The options contained within this setting allow for the rendering of email into any of 6 different formats: MSG (Unicode), RTF, HTML, MHT, TXT or EML. The default setting is MHT, self-contained hypertext document. To change to a different format, for example to export MSG or EML native filetypes for review, choose the desired format from the drop-down menu.
Apply to Loose/Attached Email – To format MSG and EML attachments in the selected format check the Apply to Loose/Attached Email checkbox. If this setting is deselected MSG and EML attachments will not be formatted and will be exported in native MSG and EML format.
NSF Handling – This setting dictates the email handling for Lotus Notes email items within NSF files, defining the export of the parent email to 4 different formats of Formatted Text, Item Level DXL, MHT or PDF. The default setting is MHT, self-contained hypertext document. To change to a different format, make a selection from the drop-down menu.
Short Message Handling - The default for handing Relativity® Short Message Format (RSMF) information is to digest conversations by day in PDF format. In order to send this format to Reveal, you must select Conv. by Day as the Short Message Handling format. For more information see Processing Short Message Format.
Export Sort Options – By default, exports are sorted by CUSTODIAN, PARENTDOCTYPE, IMPORTPATH. To change the sort order of the export, add the fields in the order in which the export should be sorted.
The fields listed in the left-hand column are Available Fields. To add one or more of these fields to the sort order, select one or multiple fields and click the Add Fields button.
The fields listed in the right-hand column are the Selected Fields: these are the fields specifying the sort order of the export. To remove select the field(s) and click the Remove Fields button. This will move the unwanted fields back into the Add Fields section. The export will be sorted in the order the fields appear.
To change the order of the sorting field(s) select the field(s) and use the
 to move the field(s) up and down in the desired sort order.
Creating an Export - Load File Options
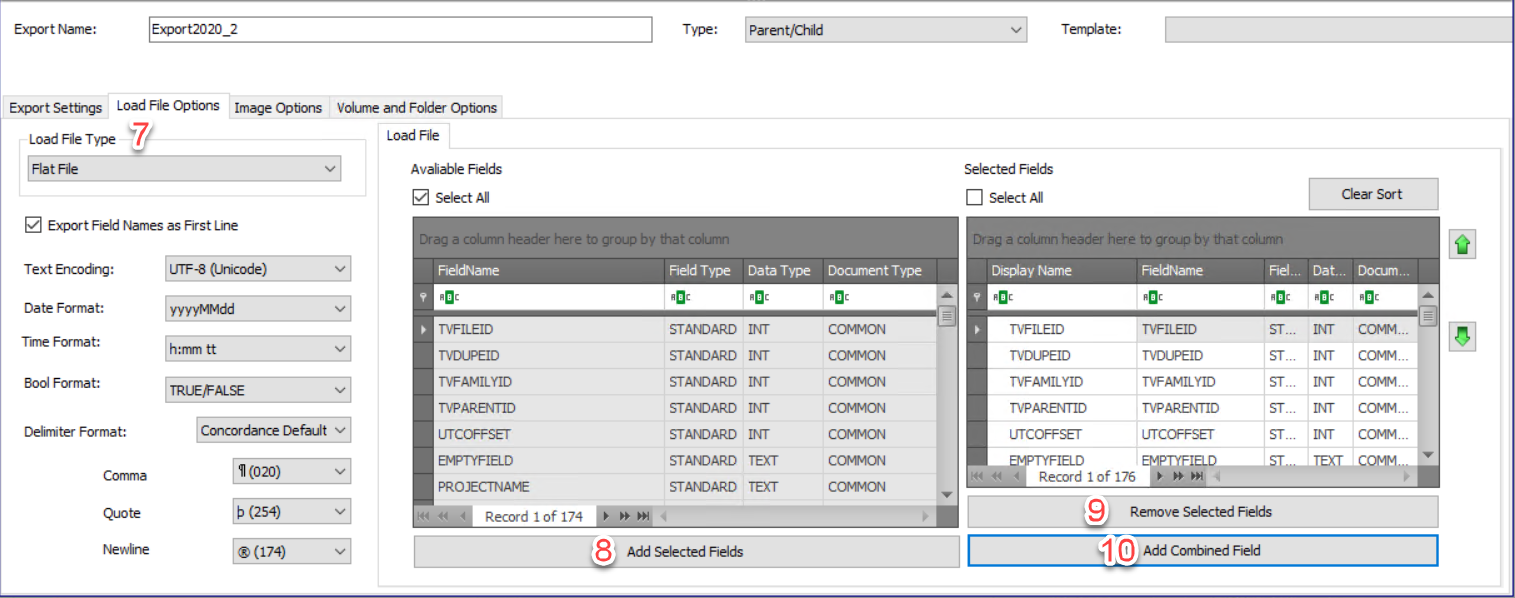
Load File Options – The following settings are available for the exported load file or DAT file:
Load File Type – There are two options for Load File Type:
Flat File – This setting will produce a DAT file with the export.
EDRM XML 2.0 – This setting will produce an EDRM XML 2.0 load file with the export. This will remove many of the load file settings, but will add a new column in the Selected Fields table. For further details, please see the Selected Fields section below.
Export Field Names as First Line – To export the field names as the first line field labels in the load file select this Export Field Names as First Line setting.
Text Encoding – The text encoding will encode the text within the resulting load file to the selected setting of either UTF-8 (Unicode) or ASCII. The default setting is UTF-8 (Unicode), which supports a much broader range of characters. To change this to ASCII click the drop-down and choose ASCII.
Date Format – There are 7 different formatting settings for all date fields contained in the load file. The default is yyyymmdd; Year-Month-Day is generally preferred for clean date sorting. To change this, click the
 drop-down and choose the desired format.
Time Format – There are 8 different formatting settings for all time fields contained in the load file. The default is h:mm:tt. To change this, click the
 drop-down and choose the desired format.
Boolean Format – There are 2 different formatting options for Boolean fields contained within the load file. The default is TRUE/FALSE. To change this click the
 drop-down and choose YES/NO.
Delimiters – This allows the customization of the delimiters to define fields and records within the load file. The default for Delimiters is Concordance Default.
Selected Fields – Currently there are over 170 fields available for inclusion in the load file. The fields are classified under the three Document Types of Common, Efile, Email. To add a field to the load file, select one or multiple fields in the Available Fields table (or filter the heading of the Document Type column to select all the fields of the specified type) and click the Add Selected Fields button. This will add the Selected Fields to the load file. Checking Select All above the Available Fields table and clicking Add Selected Fields will export all available fields if that is desired. A field can be used more than once in the load file. You may optionally drag a selected column header to the space at the top of the Selected Fields table to group output by that column (Field Type, Data Type or Document Type).
Note
To see a complete listing of these fields as well as a description of the field please see Appendix D.
Remove Selected Fields – To remove any fields from the Selected Fields table click to select a field or use CTRL-click to select multiple fields and click the Remove Selected Fields button. This will move the unwanted fields back into the Available Fields section. These fields will be exported in the order in which they appear. To move the order of the field(s) around, select the field(s) and use the
 to move the field(s) up and down in order.
Note
For EDRM XML 2.0 load files, a new column EDRMDataType will be added to the Selected Fields table. This value will be set to what is believed to be the correct corresponding EDRM data type for the Discovery Manger export field. When importing the EDRM XML 2.0 load file into another tool, the EDRMDataType may have to be changed to have the field properly import into the downstream tool. To change the EDRMDataType, click in the field and type the corrected corresponding EDRM data type. For more information about the EDRM XML 2.0 Data Type settings please see http://www.edrm.net/projects/xml/2-0-schema.
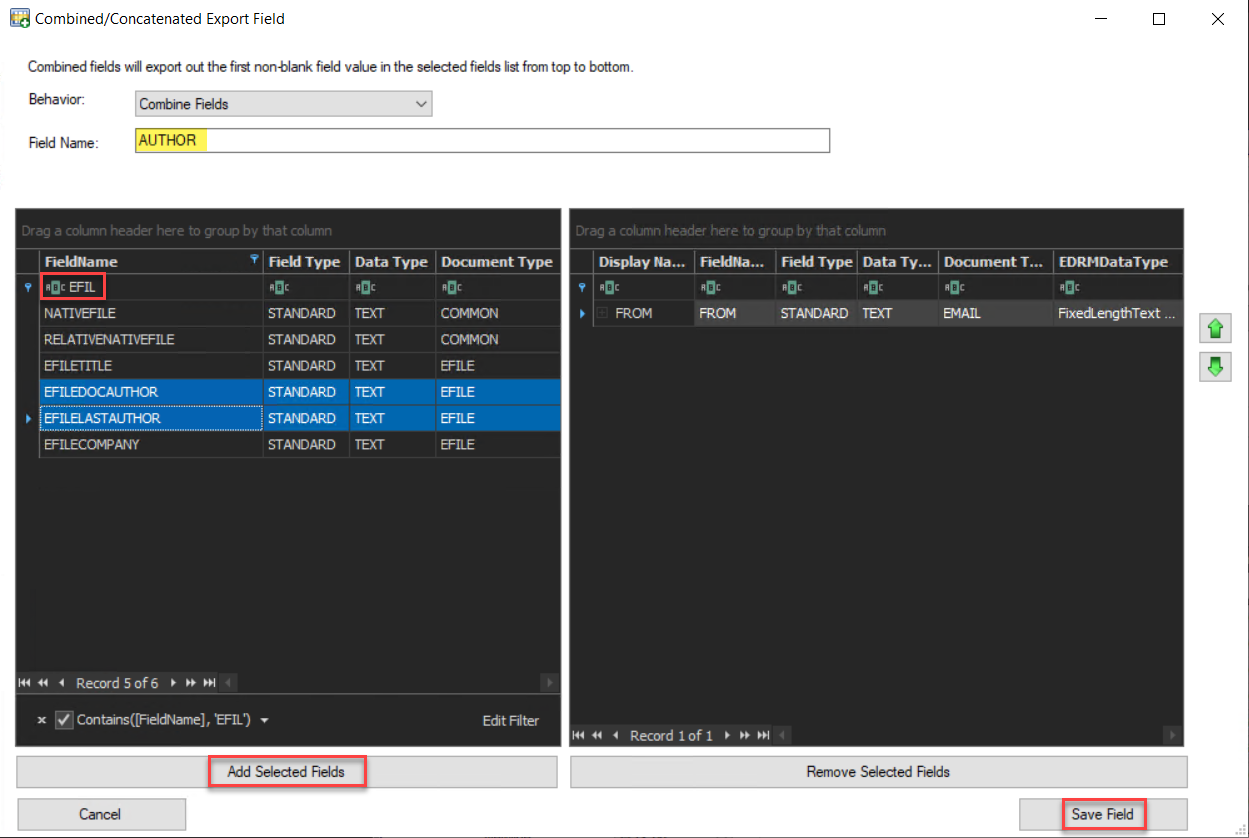
Add Combined Field – There are two types of combined fields that can be created at export time: Combined Fields and Concatenated Fields. To create one or both of these field types at export time, click the Add Combined Field button to launch the Combined/Concatenated Export Field form and follow the instructions below:
Note
Combined fields can only be used within a Parent/Child Export.
Combine Fields – This combined field is a custom field that will be populated at export time with the first non-blank value for the selected fields.
Click the Add Combined Field button to launch the Combined/Concatenated Export Field form.
Enter a new Field Name.
Select one or multiple fields.
Click the Add Selected Fields button.
To remove any of these fields select the field(s) and click the Remove Selected Fields button.
To rearrange the order of the fields (which will determine the order in which each is tested for a value to include in the exported combined field) select a field and use the
 key to move the field up and down in order.
When the Selected Fields are in the correct order, click the Save Field button and the combined field will be saved.
Note
The example below shows a combined field being created named AUTHOR that will be populated first with the FROM value of emails. If that value is not present for the file it will then be populated with the EFILEDOCAUTHOR field. If that value is not present for the file, it will then be populated with the EFILELASTAUTHOR field. Finally, if all three of these fields are not present for the file, the AUTHOR field will be populated with nothing.
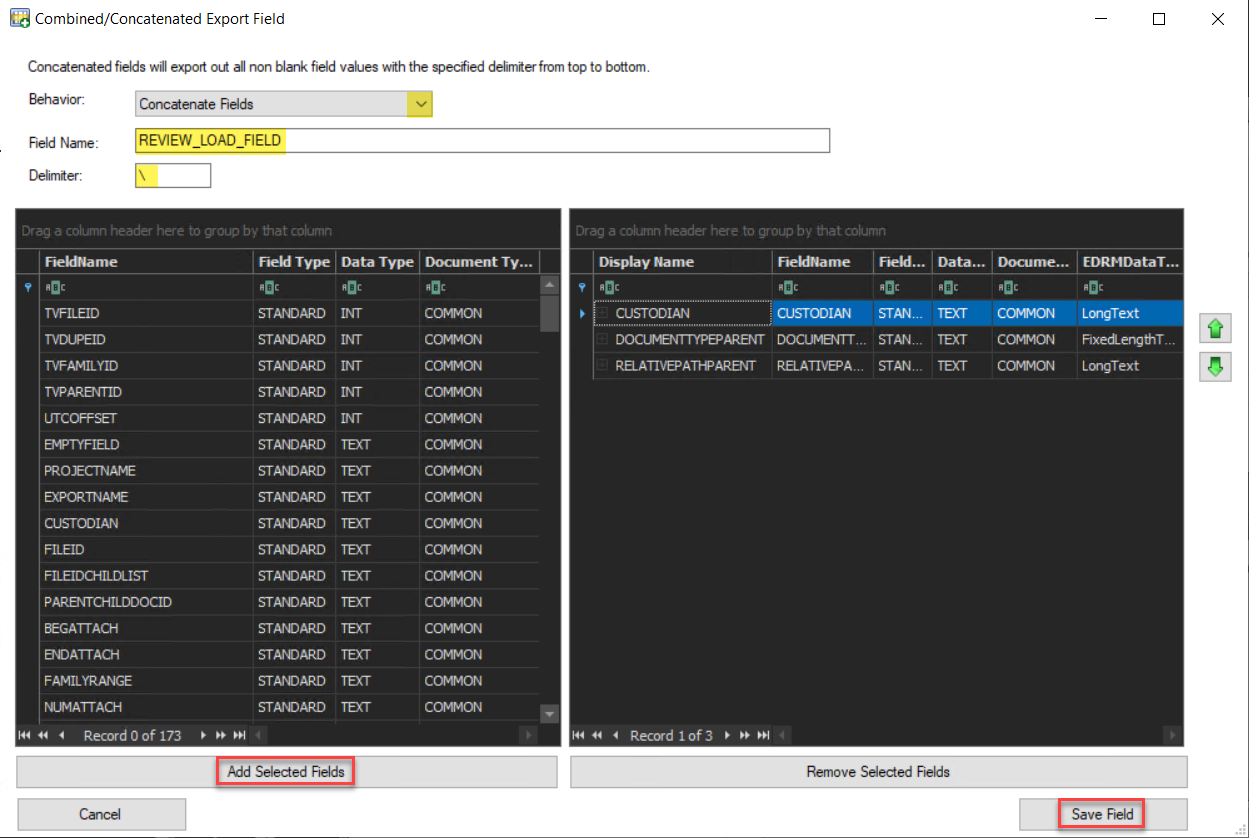
Concatenate Fields – This combined field is a custom field that will be populated at export time by combining the values of the fields selected, set off with a specified delimiter.
Click the Add Combined Field button to launch the Combined/Concatenated Export Field form.
Change the Behavior drop-down to Concatenate Fields.
Provide the Field Name.
Provide the Delimiter that will be used between the fields.
Select one or multiple fields and click the Add Selected Fields button.
To remove any of these fields select the field(s) and click the Remove Selected Fields button.
To rearrange the order of the fields (which will determine the order of values set out in the resulting concatenated field) select a fields and use the
 buttons to move the fields up and down in order.
When the Selected Fields are in the correct order, click the Save Field button, and the concatenated field will be saved.
Note
NOTE: The example below shows a concatenated field being created named REVIEW_LOAD_FIELD. This field will combine the fields specified below with the ‘\’ between them. In this example, the REVIEW_LOAD_FIELD would be populated with CUSTODIAN\DOCUMENTTYPEPARENT\RELATIVEPATHPARENT.
Creating an Export - Image Options
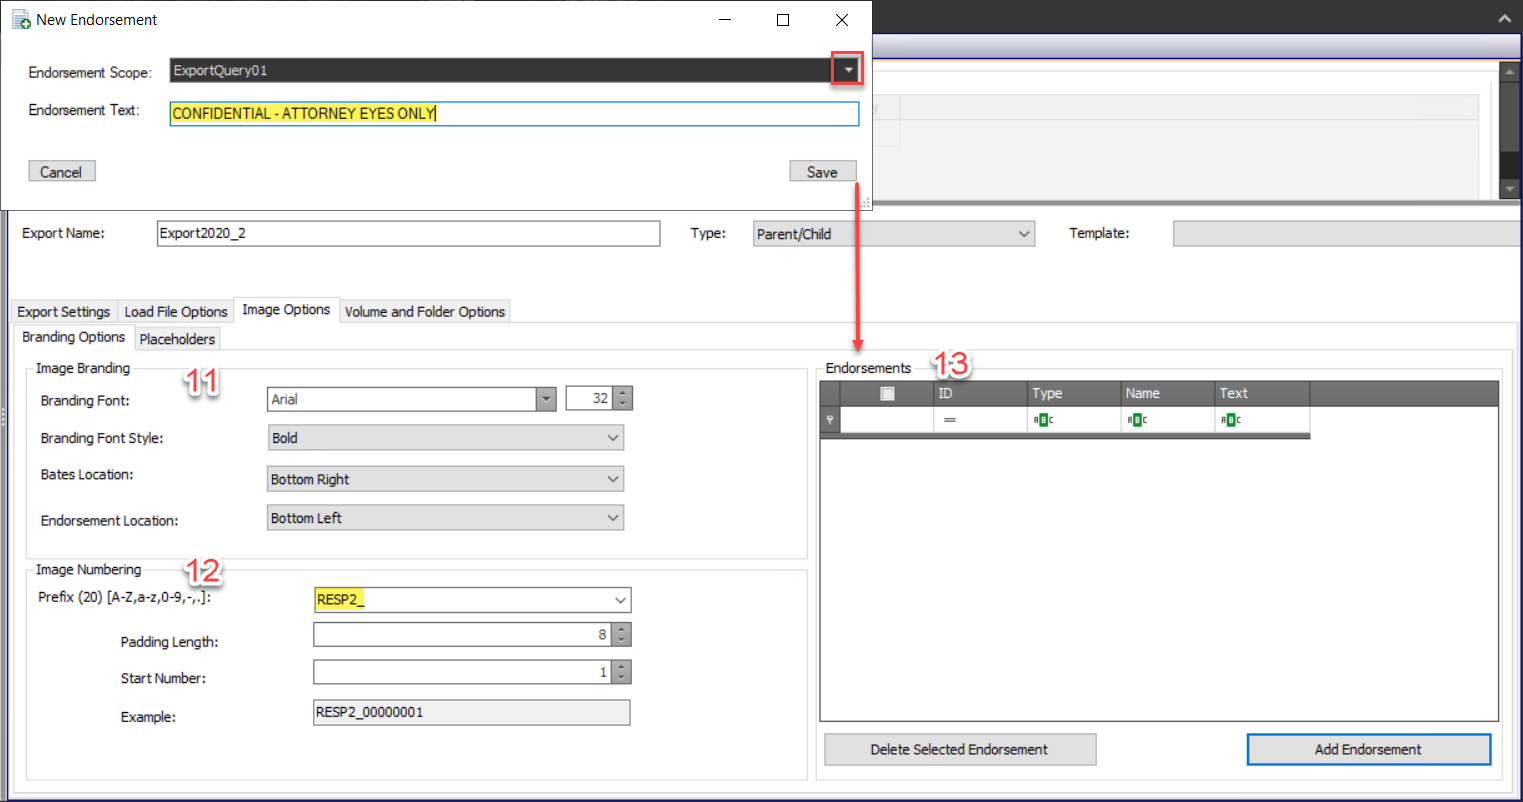
Image Branding – To brand an image the following settings are available:
Branding Font – To choose the font or font size, click on the default Arial and change the settings.
Branding Font Style – By default, all brands applied to images will be in bold font. To change this, click the Bold drop-down and select either Regular or Italic.
Bates Location – To brand the image’s bates number on the image click the drop-down and choose the branding location. The default of No Bates Stamp, but the recommended selection if stamping is Bottom Right.
Endorsement Location – To choose a location to brand the image’s endorsement, click the drop-down and choose the location.
Image Numbering -- To set the numbering for image pages you may configure the following options:
Prefix -- You may specify a Custom prefix by typing the preferred alphanumeric text in the Custom space; it will appear in the Example below. Otherwise you may select the FileID or TVFileID field values as prefix with a specified delimiter.
Padding Length -- Set the length of the numbering with leading zeros; the default is 8.
Start Number -- A running export may require a number other than the default 1.
Example -- Displays the Prefix, Padding Length and Start Number as the combination will appear on an image brand.
Endorsements – To use a Selective Set as the scope of files to receive an Endorsement, click Add Endorsement, choose the desired set as the Endorsement Scope and add the Endorsement Text. All files within the scope of the Export and Selective Set will receive the Endorsement Text at the Endorsement Location. In this example, the text CONFIDENTIAL - ATTORNEY EYES ONLY would be branded on all images for the files contained within the Selective Set Export Query.
Note
Multiple Endorsements for files are supported. If a file is contained within more than 1 Endorsement, the Endorsements will appear in the order they appear in the Endorsements Table from top to bottom in the image.
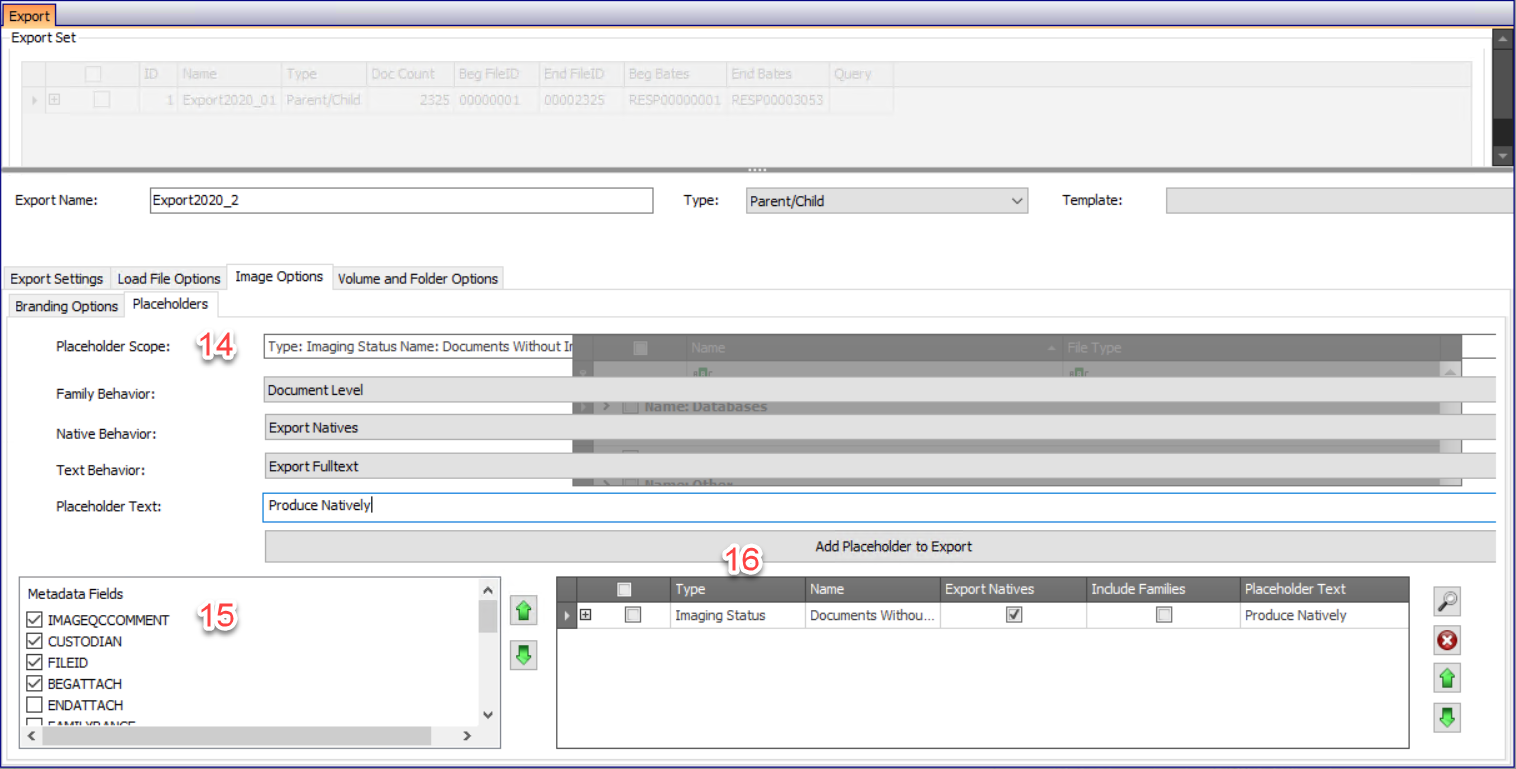
Placeholders – A placeholder substitutes a formatted image for a file in an Export or a Production where either an image could not be created during imaging or where certain content needs to be removed and replaced with a generic record. Typical use cases are where an excessively large and complete spreadsheet fails imaging, or where there are privileged files within a Production which need to be withheld. There are five settings to choose from when adding Placeholders to an Export or a Production.
Placeholder Scope – To choose a scope of documents to replace with a Placeholder, click into the selection box and choose one of the following two options from the table:
Type File Type – This setting enables the File Types Table. Once enabled, File Types can be selected to be treated as Placeholders. A use case for this is treating Excel and PowerPoint files as Placeholders and produce the files in their native format. In this example, this setting would be selected, and Presentations/Spreadsheets would be selected.
Type Imaging Status – This setting will isolate all imaging errors within the selected Export scope.
Family Behavior – By default, Placeholders are assigned on the Document Level. To apply the Placeholder to the entire family, click Document Level and choose Family Level.
Native Behavior –By default, native files will export for the Placeholder files. To disable this so that native files are not exported for the Placeholders, click Export Natives and choose Suppress Natives.
Text Behavior – By default, the FullText for the Placeholders will be exported if available. If no text is available for the file, the Generate Placeholders for No Extracted Text from the Export Settings tab will be used. To disable this so that a Text Placeholder is exported for all Placeholders with the Placeholder Text, click Export Fulltext and choose Export Placeholder Text. This will only export a text file for all Placeholder files with the verbiage provided in Placeholder Text.
Placeholder Text – This text will appear in the center of the image placeholder and will be the only text provided in the Text Placeholder, if the Text Behavior is set to the option Export Placeholder Text.
Metadata Fields – An image Placeholder can have metadata applied to the image to provide more information about the file. To apply one or more metadata values to the image placeholder, click the checkbox
 next to the metadata value. The metadata values will appear in the order they are selected. To move a metadata field’s order, choose the metadata field and click the
  buttons. To find information regarding the metadata field values, please see Appendix D.
Placeholder Table – After applying the Placeholder settings and the Metadata Fields, click the Add Placeholder to Export button and the Placeholder will be added to the Placeholder Table. If the Export is of the type Production and the Production has files that were added to the Privileged Tag Group, the Placeholder for this Privileged Tag Group will appear in the table as the first Placeholder. There are several fields and Placeholder management functions within this table.
Type – This is the Type value chosen when creating the Placeholder, and can only be Imaging Status, File Type, Selective Set, or Privilege.
Name – This is the Name value chosen when creating the Placeholder, and can only be Document Without Images, Selected File Types, the name of the Selective Set, or Privilege Tag Group.
Export Natives – If checked, the Native Behavior for the Placeholder was set to Export Natives. If unchecked, the Native Behavior for the Placeholder was set to Suppress Natives.
Include Families – If checked, the Family Behavior for the Placeholder was set to Family Level. If unchecked, the Family Behavior for the Placeholder was set to Document Level.
Note
Include Families can only be set within Review for the Privilege Tag Group. If this is selected, the entire family will be withheld from the Production and treated as a Placeholder.
Placeholder Text – The text of the image and text (if applicable) placeholder.
Placeholder Table Management – There are 3 different management options available for the Placeholder Table:
View Placeholder – To view how the Placeholder will look at export time, click the
 for the item in the table, and click the
  button.
Delete Placeholder – To delete the Placeholder, click the
 for the item in the table, and click the
  button.
Order Placeholder – The order of Placeholders matter. If a file is contained in more than 1 Placeholder, the file will receive the settings from the topmost most Placeholder the file is contained in. To move the order of the Placeholders around, click the
 for the item in the table, and click the
  buttons to move the Placeholder to the proper order.
Note
If available in a Production Export, a Privilege Tag Group Placeholder will always receive the topmost position in the Placeholder Table, and cannot be moved from this position.
Creating an Export - Volume and Folder Options
Parent/Child and Production exports have the following default structure. Depending on the export or production criteria, it may be necessary to control this folder structure. The Volume and Folder Options allow users to control this.
Export Path:
IMAGES
Custodian
00000001
About 1000 images per folder.
00000002
Etc.
NATIVES
Custodian
00000001
About 500 natives per folder.
00000002
Etc.
TEXT
Custodian
00000001
About 500 images per folder.
00000002
Etc.
All DAT files at the root of the Export Path.
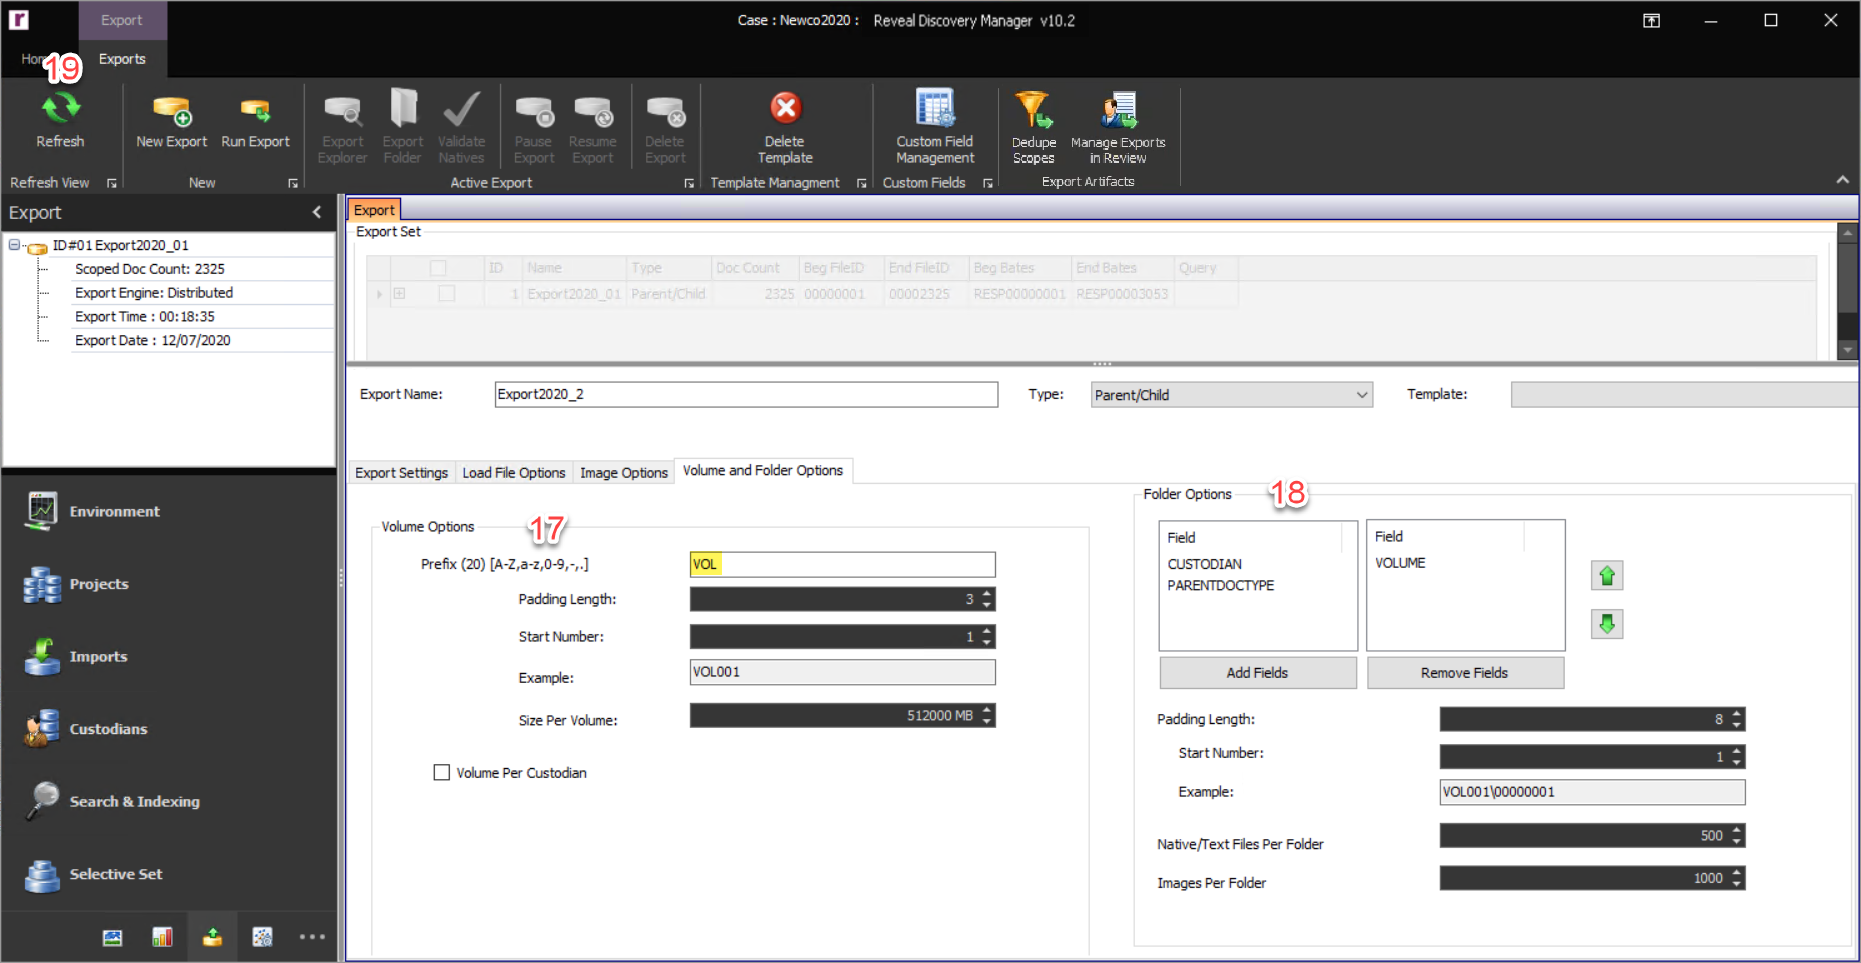
Volume Options – Volume is another word for the Export's top level or parent folder that contains data underneath it. When the Volume reaches the Size Per Volume setting, a new Volume is created. The following settings are available for the Volume Options:
Prefix – The prefix is the first sequence of the numbering scheme. It will remain constant and appear on each Volume.
Padding Length – This controls the number of characters after the prefix. By default, this is set to 3 characters.
Start Number – The initial number applied to the first Volume in the export set.
Example – The example of how the labeling as configured will look on the first Volume in the export set.
Size Per Volume – This is the maximum amount of data that can go into a Volume. When a Volume reaches this maximum size, a new Volume is created, incrementing the Start Number by 1. The default Size Per Volume is 512000 MB or 500 GB.
Volume Per Custodian – If Selected, a new Volume will be created per the Custodians contained within the export set.
Folder Options – Underneath each Volume is a folder structure that will contain a folder per selected Folder Option, the folders of IMAGES/NATIVES/TEXT (depending on what is in the export set), followed by the population of these folders with their corresponding data. The following Folder Options control how these folders are created and populated for a given Volume:
Add Fields – Currently there are a total of 3 fields to choose from for the Folder Options, which are detailed below. Each time a field is selected and added, a new folder will be created at export time underneath each Volume with that information, in the order in which the fields appear in the Selected Fields table. To add a field, select one or multiple fields from the left-hand Available Fields box and click the Add Fields button.
VOLUME – This is the default folder. If only this field is selected the Volume will only have the Volume name, followed by the folders of IMAGES/NATIVES/TEXT (depending on what is in the scope of the export), followed by the population of these folders with their corresponding data.
CUSTODIAN – If added, a subfolder to Volume will be created for the Custodian. If this is the last folder selected, the folder will be followed by the folders of IMAGES/NATIVES/TEXT (depending on what is in the scope of the export), followed by the population of these folders with their corresponding data.
PARENTDOCTYPE – If added, a subfolder will be created for EMAIL (all email and attachment for the given volume) and/or EFILE (all efiles and embedded objects) depending on the file type of its direct parent. If this is the last folder selected, the folder will be followed by the folders of IMAGES/NATIVES/TEXT (depending on what is in the scope of the export), followed by the population of these folders with their corresponding data.
Remove Fields – The right-hand box contains the Selected Fields for folders that will be created within the Volume. These fields will be generated on export in the order they appear.
To change the order of the fields select any fields and use the
 to move the fields up or down in order.
To remove any of these fields select the field(s) and click the Remove Fields button. This will move the unwanted fields back into the Available Fields section.
Padding Length – This controls the number of characters for the folders underneath the IMAGES/NATIVES/TEXT (depending on the scope of the export) folders. By default, this is set to 8 characters.
Start Number – The first number applied to the first folder for the IMAGES/NATIVES/TEXT (depending on what is in the export set). By default, this is set to 1.
Example – The example of how the labeling will look for the first folder underneath the IMAGES/NATIVES/TEXT (depending on what is in the scope of the export) folders.
Native/Text Files Per Folder – The number of native and text files that will be found in each folder underneath the NATIVES/TEXT folders (depending on what is in the export set). By default, this is set to 500 per folder.
Images Per Folder – The number of images that will be found in each folder underneath the IMAGES folder (depending on what is in the export set). By default, this is set to 1000 per folder.
Note
Families will not be broken in these settings. If an individual family violates the Size Per Volume, or the Images/Native/Text Files Per Folder settings, the export will error out, and these settings will need to be revised.
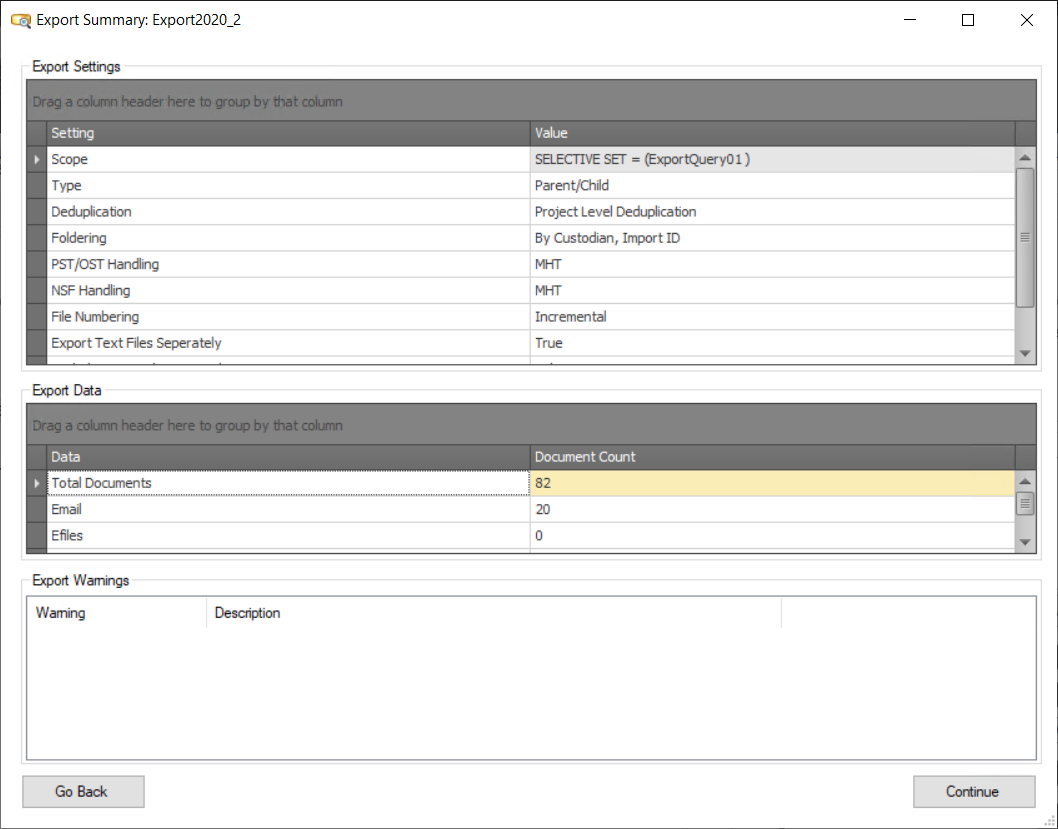
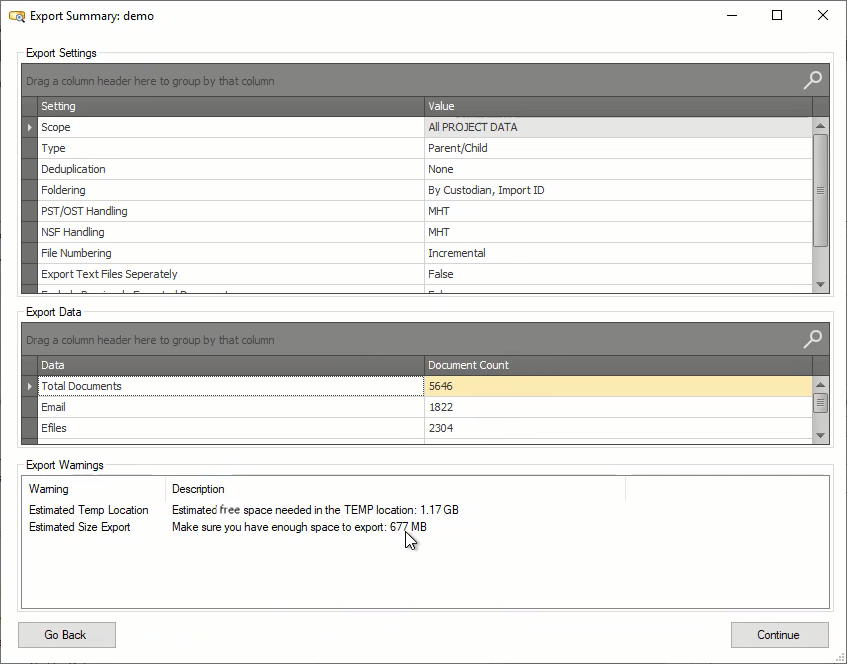
Note
The Total Documents in the Export Summary will always be less than first expected as email will be exported back into its native format meaning attachments will not be broken out as separate files. In a Natives Only Export the value for attachments will always be 0 as seen below.
Refresh – Click the Refresh button to refresh the Export Module to show new export sets created or removed as well as to update the export group’s statistics.
Note
Clicking Refresh while configuring an Export will clear all settings. Do not click Refresh until the Export is underway.
Monitoring an Export
All Exports can be monitored within the Exports Module under the Export Status tab of the Export job. The Export can also be monitored within the Environment Module.
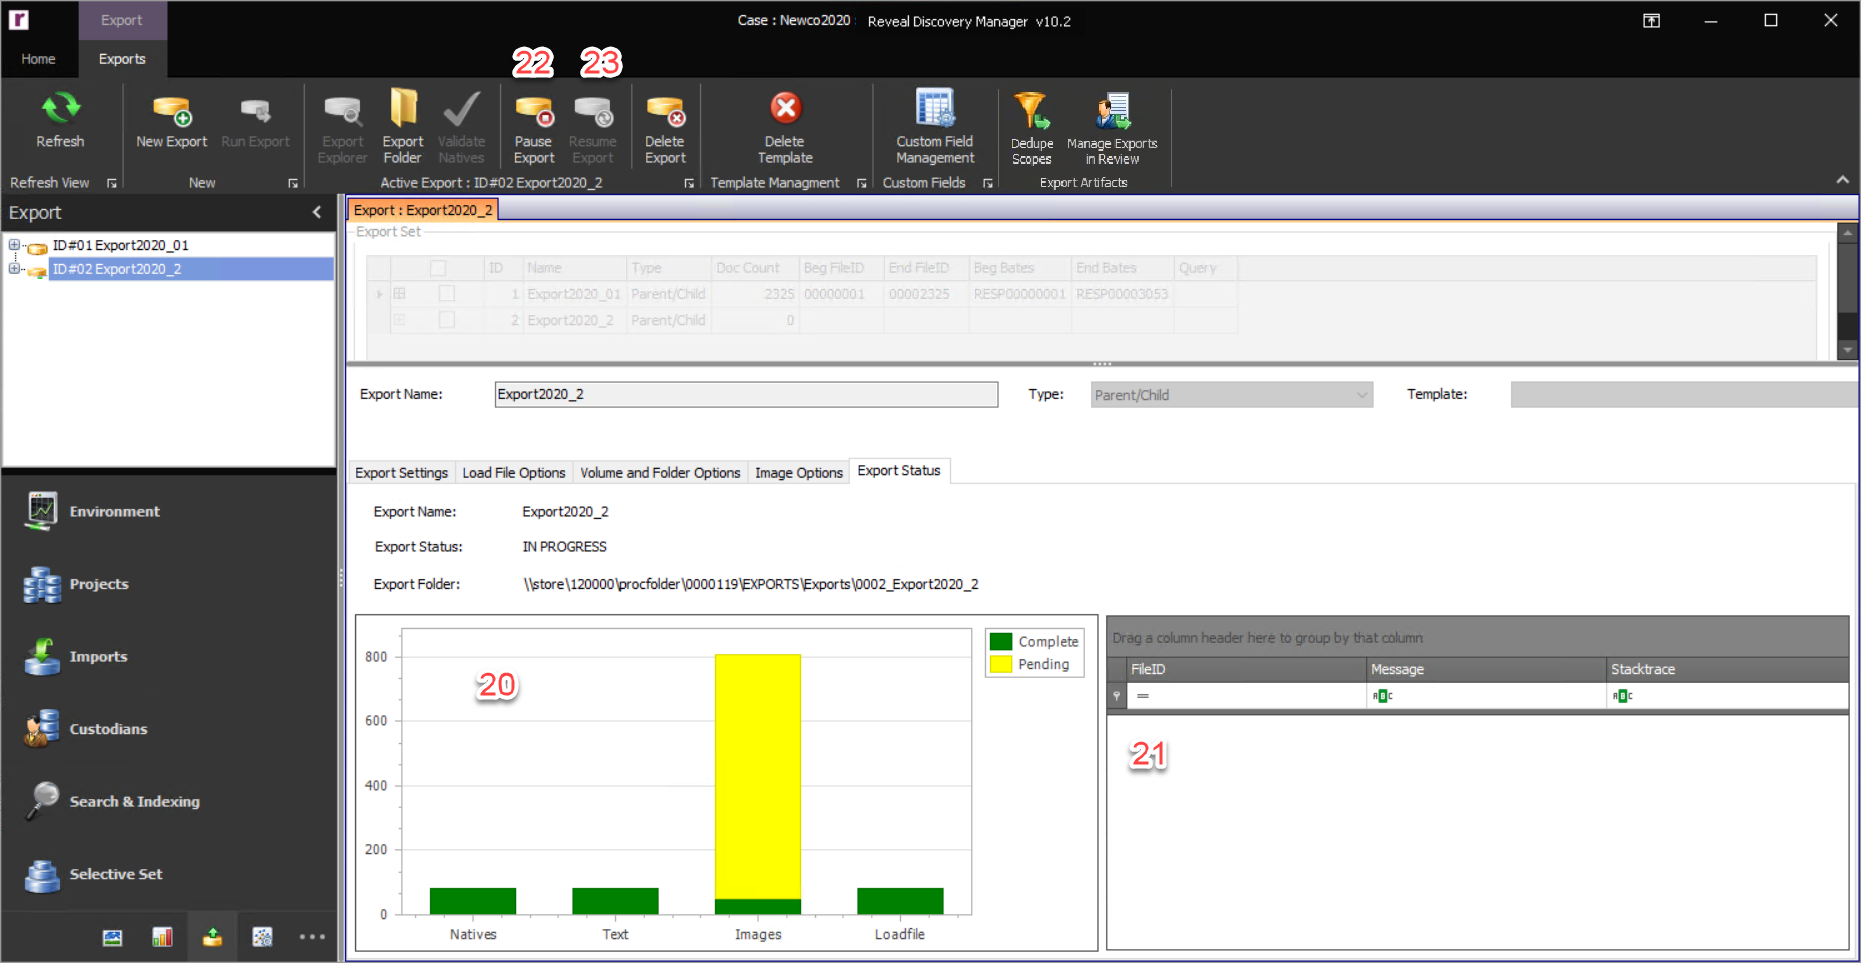
Export Status – The Export Status chart will auto-refresh providing the status of an Export. An Export can also be monitored within the Environment Module.
Export Errors – Errors will be displayed in the Export Errors table if encountered during the Export.
Pause Export – To pause an Export, click the Pause Export button.
Resume Export – To resume an Export, click the Resume Export button.
Note
As of Release 10.2, an automatic Export pre-check will assess the available space in the processing local system's defined TEMP folder and compare that with the estimated volume requirement of the Export as defined. If a potential space issue is detected, a warning will be issued in the Export Summary.
After Creating an Export
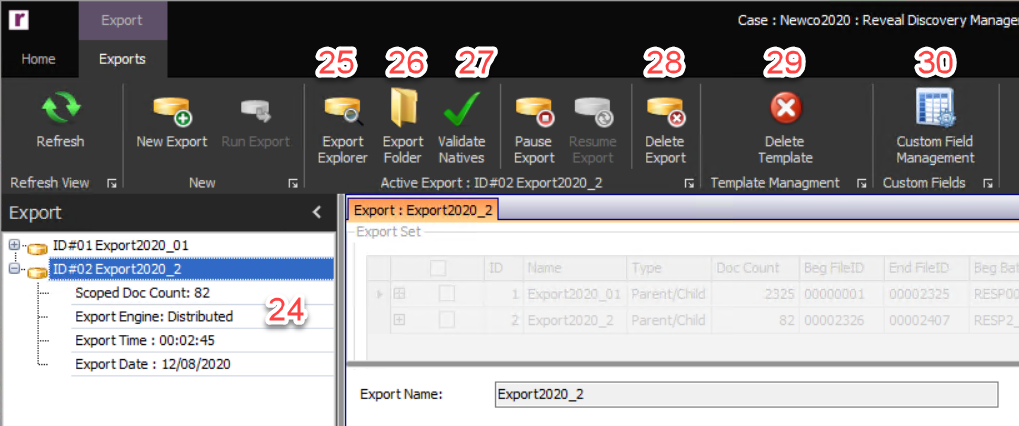
Export Module Navigation – After the export has successfully completed processing, the
 icon will be displayed in the Module Navigation. If the export had any issues, the
  icon will be displayed in the Module Navigation. Next to the Export icon is the Export Name. The Export Tree View when expanded has the following values:
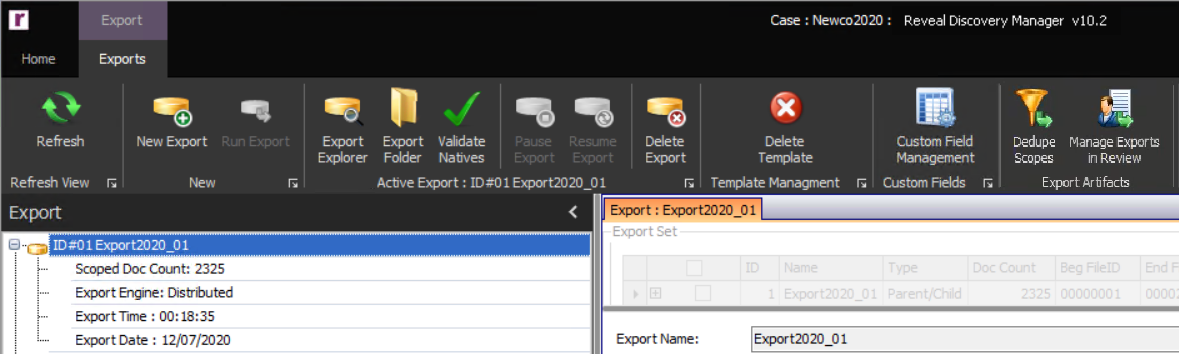
Scoped Doc Count – This is the export’s expected native files count to be copied out to the Export Location. This count should match the Actual Count.
Export Engine – This notes the machine that processed the export.
Export Date – The date on which the export was run.
Export Explorer – To view an export for QC purposes, select the export by clicking on it, and then click the Export Explorer button in the Export Ribbon. Depending on the size of the export, this can take a little bit of time to open.
Note
Once opened, it is possible to group the load file by a certain field/column by dragging and dropping that field/column to the top of the table above the first field/column. For example, it might be part of the QC workflow to group the Export Explorer by Custodian to make sure that all Custodians were properly included in the load file.
Export Folder – To go directly to the export folder in Windows Explorer, click the Export Folder button in the Export Ribbon.
Validate Natives – After selecting an export, if the Actual and Expected Count does not match click the Validate Natives button in the Export Ribbon. Click the Validate Natives button to create a log (TVFILEID, NATIVEFILE) of the files where the native file was not successfully copied to the export location.
Note
If any results are returned please use the TVFILEIDs to create a Selective Set of these error files using the File ID List tab in Selective Set. Once the Selective Set is created try exporting the files out again to see if this was a hiccup or a true issue. If the files error out again, first email support@revealdata.com alerting the Reveal Technical Support Team of your issue. Then please export the Selective Set using the Natives Only Export setting, zip up the results, and FTP the data to the Reveal Technical Support Team.
Delete Export – To delete an export first select the export in the Export Module Navigation and then click the Delete Export button in the Export Ribbon.
Delete Template – To delete a project level export template, click the Delete Template button in the Export Ribbon and select the template to be deleted.
Custom Fields – Custom Fields is a way for users to bring external data into Discovery Manager to use the data as a field in a load file. An example of a custom field would be to bring coding in from an external review tool to include that coding in the load file. Another example might to create custom universes of files like a custom Index Status for the files etc. To create a custom field, click the Custom Field Management button to launch the Custom Field Management form seen below:
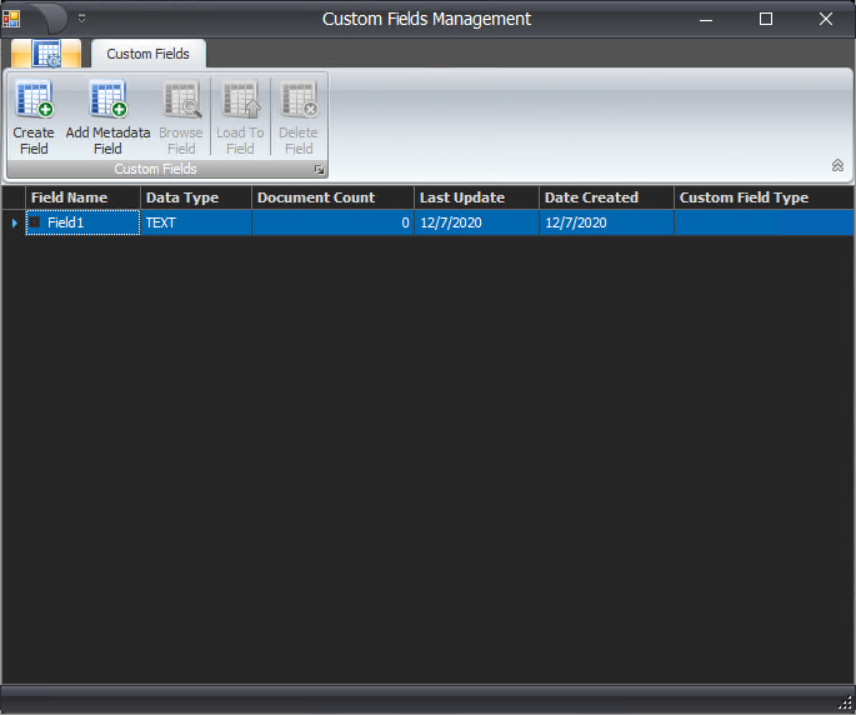
Create Field – Click the Create Field button to create a new field.
Add Metadata Field - Select an existing field to add.
Browse Field – Choose a field and click the Browse Field button to view the field’s contents in a table to validate the results of uploaded data to the field.
Load To Field – Choose a field and click the Load To Field button to launch the Load Data to Custom Field form. This form allows a user to upload or overlay a load file into the field.
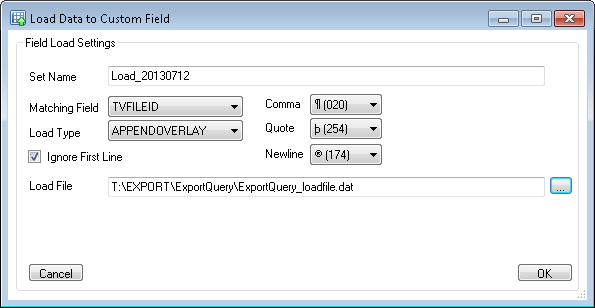
Set Name – The name of the set that is being uploaded to the field. It is possible to have more than one import or load per field.
Matching Field – This field should be the first field in the load file. When uploading information into the custom field, this field is used to pair the information with the file’s unique identifier. The information in the second field or column of the load file will be added to the field. There are only three matching fields allowed when populating a field:
TVFILEID – The default Matching Field is the TVFILEID, which is the Discovery Manager FileID or unique identifier. Using this field is recommended as there will never be a duplicate value in this field in Discovery Manager.
FILEID – The exported FileID. This is the file level file number generated at export time.
BEGBATES – The exported BEGBATES. This is the file level bates number or BegBates generated at export time.
Load Type – There are three load types:
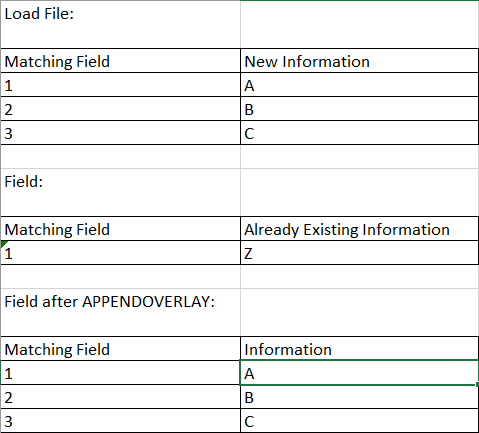
APPENDOVERLAY – The default Load Type is APPENDOVERLAY. If no fielded information exists for the Matching Field in the field, the data will simply be added to the field. If information exists in the field and the load file contains information for a Matching Field value which already exists in the field, the new information will overwrite the existing value and new information will be added to the fields as seen below:
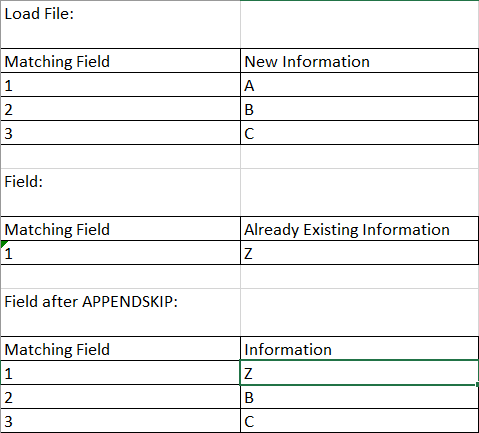
APPENDSKIP – If no fielded information exists for the Matching Field in the field, the data will simply be added to the field. If information exists in the field, and the load file contains information for a Matching Field value which already exists in the field as well as new information, the existing value will be skipped and the new information will be added to the fields as seen below:
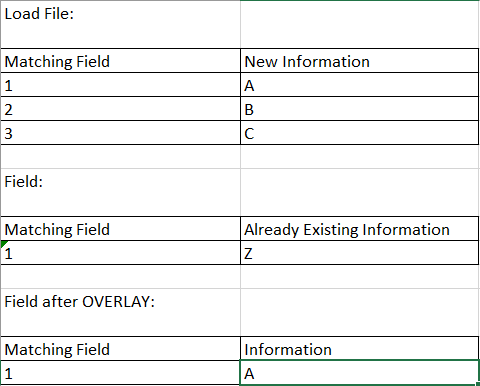
OVERLAY – If no fielded information exists for the Matching Field in the field, the data will simply be added to the field. If information exists in the field, and the load file contains information for a Matching Field value which already exists in the field as well as new information, the existing value will be overwritten, but the new information will not be added to the fields as seen below:
Ignore First Line – If the first line of a load file contains column headers or field labels click the
 checkbox to skip this line when uploading data from the load file into the field.
Delimiters – This allows the user to choose the delimiters within the load file. The default for Delimiters is Concordance Default.
Load File – Click the
 button to browse to the load file that will be used to upload information into the field.
Delete Field -- Select a field from the list and click Delete Field to remove it.