Imaging Module
The Imaging Module creates, manages and deletes imaging jobs within the project. Even though Discovery Manager only images original files, all counts displayed within the Imaging Module are total counts, meaning they have both original and duplicate files included in the counts.
When creating imaging jobs, the user will change any imaging settings (if applicable), choose the scope of files to image, and click the Image Selection button: an imaging job will be created in the Imaging Module Navigation with the  icon. Every time an imaging job is created with a scope (e.g. Custodian, Selective Set), Discovery Manager will only pull back the original files that are within the scope that have not been imaged in any prior jobs, and create a new imaging job underneath the scope or top node.
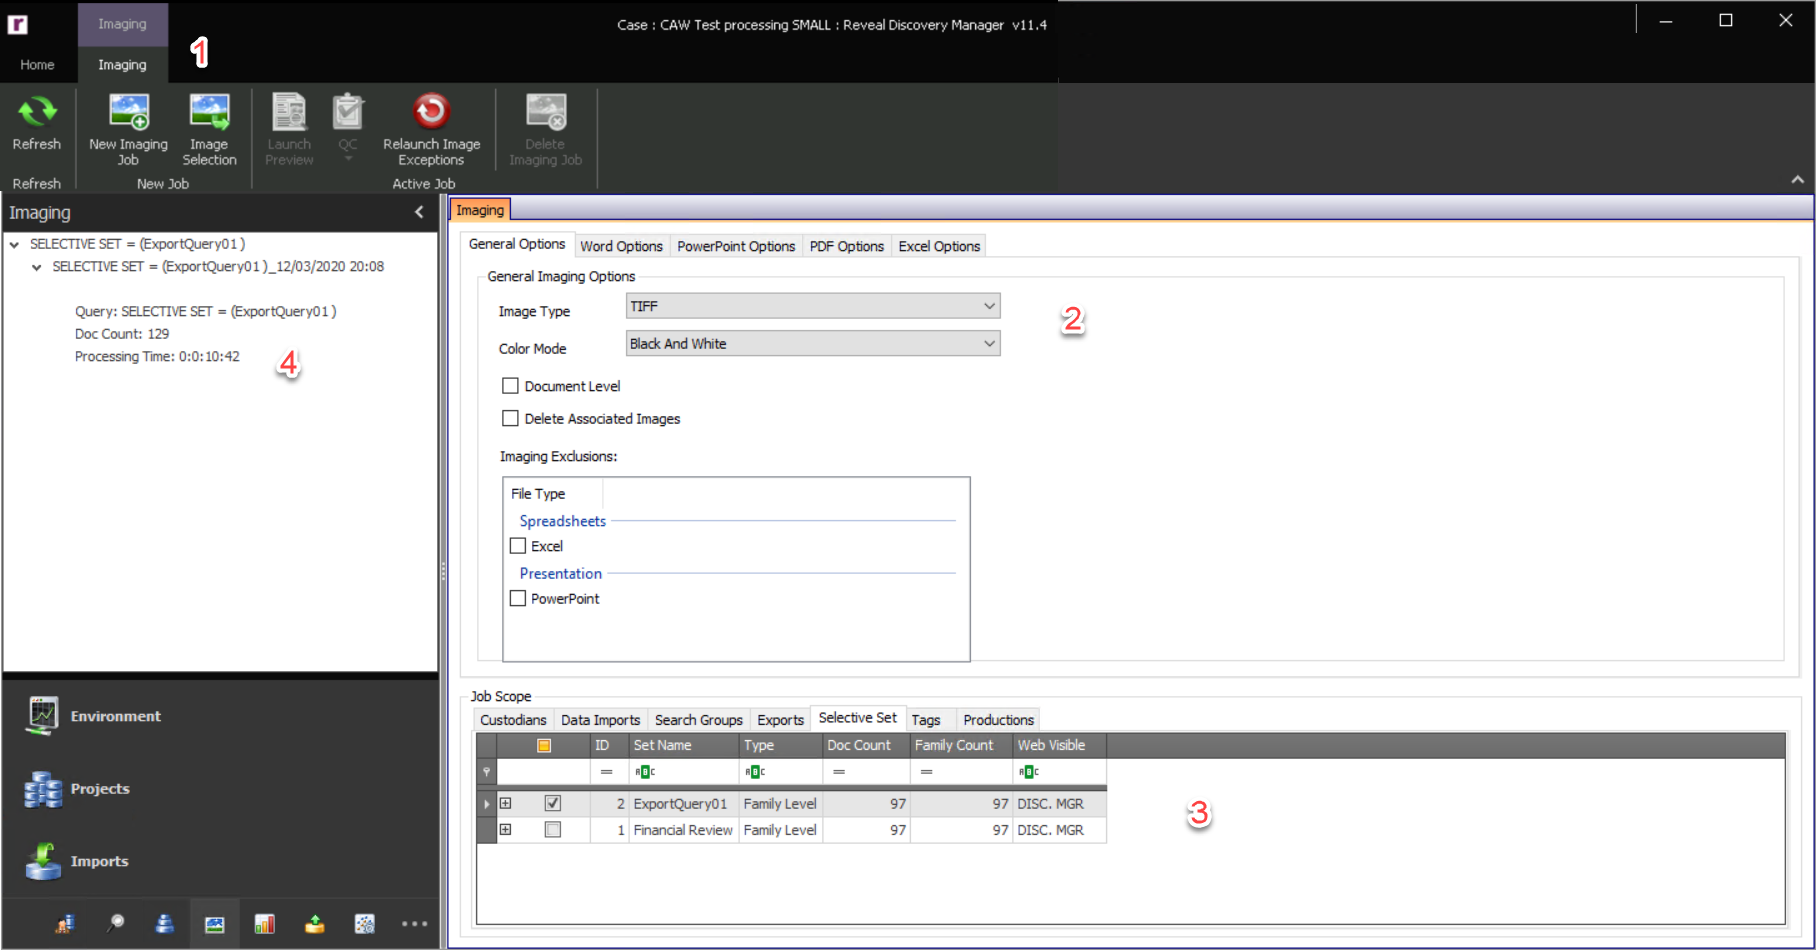
For example, in the image below the Selective Set Export Query was used to create Imaging Job 001_SELECTIVE SET = (ExportQuery01)_12/03/2020 20:08. A week later, new data is imported into Discovery Manager that is responsive to the Selective Set ExportQuery, thus increasing the number of files within the Selective Set. The user could image the Selective Set ExportQuery again, and a new job named 002_SELECTIVE SET = (ExportQuery01)_12/10/2020 10:52 would be created underneath the scope or top node, containing only the original files within the Selective Set that have not been imaged.
Creating an Imaging Job
New Imaging Job – Click the New Imaging Job button in the Imaging Ribbon to launch the Imaging Data form.
Imaging Default Settings – When imaging a set of data several settings can be applied depending on the file type. The settings chosen within the Project Creation Wizard will automatically be applied to the settings within the Imaging Module, so they do not have to be reapplied when imaging a set of data. If needed, these settings can be changed after creating the project in both the Project Settings or within the Imaging Module itself. If these settings do change, the files that were imaged prior to the change will need to be reimaged for these settings to take effect for the poject as a whole.
General Options – The following are the general settings for imaging that can be manipulated:
Image Type -- choose between TIFF (the default) and Pre-Render for Redactions.
Color Mode: Black And White – The default setting is Black And White for imaging. This means that all images that are created will not have color. All black and white images are formatted in Group IV TIFF Format.
Color Mode: Color For Color – If any or all pages within a file have color, these pages will be imaged in color and formatted in JPEG Format. All other non-color pages will be imaged as black and white and formatted in Group IV TIFF Format.
Document Level – By default, all imaging jobs will include all family members. If it is desired to only image on the document level, click the checkbox Document Level and family members will not be pulled in when imaging the set of files.
Delete Associated Images – To delete images for files that are associated with other imaging jobs, click the checkbox Delete Associated Images and any project images associated with files contained within the scope of the imaging job will be deleted. For example, if all files within the project were imaged, but the Excel files were imaged with the incorrect settings, a user can create a Selective Set of these Excel files and image them with this setting.
Imaging Exclusions – Depending on the production requirements, receiving Excel and PowerPoint files in native format may be preferred, thus making imaging of these files unnecessary. To exclude these file types from imaging, click the checkbox
 next to one or both of these formats.
Word Options – The following explains the options that can be manipulated when imaging Word files:
Do Not Print Headers – Headers within Word files are imaged by default. To exclude headers from being imaged within Word files, click the Do Not Print Headers setting.
Do Not Print Footers – Footers within Word files are imaged by default. To exclude footers from being imaged within Word files, click the Do Not Print Footers setting.
Show Comments – Comments within Word files are imaged by default. To exclude comments from being imaged within Word files, deselect the Show Comments setting.
Show Revisions – Revisions within Word files are imaged by default. To exclude revisions from being imaged within Word files, deselect the Show Revisions setting.
Show Hidden Text – When creating Word files, users can actually choose to hide text within Word files. By default, hidden text within Word files is imaged. To exclude hidden text from being imaged within Word files, deselect the Show Hidden Text setting.
Date/Time Fields – Date/Time Fields are dynamic objects within Word that will update to the current date and time when accessed. Typically this is not desirable when imaging files for eDiscovery. The default behavior for these fields is to not print them, thus they will not be included in the image. To change this setting click the Do Not Print drop-down menu and choose one of the following settings:
Do Not Modify (print as is) – This setting will do nothing to these fields allowing the date/time fields to update to the current date and time when imaged.
Do Not Print – This is the default setting for Date/TIme fields. This setting will exclude these fields from the image.
Replace With Date Created – This setting will replace the date/time values within these fields with the system created date/time of the file.
Replace With Date Modified – This setting will replace the date/time values within these fields with the system modified date/time of the file.
Replace With Field Codes – This setting will replace these fields with a standard code instead of displaying a date/time value.
Filename Fields – Filename Fields are dynamic objects within Word that will update to the current filename when accessed. The filename field can also be accompanied by the full file path of the file depending on the settings chosen by the user when inserting this field into the file. Typically this is not desirable when imaging files for eDiscovery. The default behavior for these fields is to not print them, thus they will not be included in the image. To change this setting click the Do Not Print drop-down menu and choose one of the following settings:
Do Not Modify (print as is) – This setting will do nothing to these fields allowing the filename fields to update to the current filename when imaged.
Do Not Print – This is the default setting for Filename fields. This setting will exclude these fields from the image.
Remove Path From Filename – When adding these fields to a Word file, users have the option to include the full file path to these files. It is a foregone conclusion that these files are now not at the same place they were originally, thus the file path will be incorrect. This setting will remove the file path from the filename.
Replace With Field Codes – This setting will replace these fields with a standard code instead of displaying a filename value.
Excel Options – The following explains the options that can be manipulated when imaging Excel files:
Orientation – To change the orientation of an Excel file when imaging it, click the Landscape drop-down menu and choose one of the following values:
As Is – No orientation formatting will be applied to the Excel file and it will print with the original setting formatted by the file's creator or modifier.
Landscape – Excel files will be auto formatted to image in the Landscape orientation by default. If the Excel files are believed to be wider, this formatting setting should be used.
Portrait – This will image the Excel file in Portrait. If the Excel files are believed to be longer instead of wider, this formatting setting should be used.
Print Direction – This is the order in which the pages of the Excel file will be imaged. This Typically, will correspond with the Orientation setting. For example, if Portrait is chosen as the Orientation it makes more sense to print the Excel file using DOWN AND ACROSS or ‘N Print’. To change this, click the ACROSS AND DOWN drop-down menu and choose one of the following values:
As Is – No orientation formatting will be applied to the Excel file and it will print with the original setting formatted by the file's creator or modifier.
ACROSS AND DOWN – This is the default setting. This will print the Excel file going first across the sheet and then down. This is commonly referred to as ‘Z Print’.
DOWN AND ACROSS – This will print the Excel file going first down the sheet and then across. This is commonly referred to as ‘N Print’.
Print Gridlines – By default, Excel files are not imaged showing gridlines. To include gridlines in the Excel images select the Print Gridlines setting.
Print Hidden Worksheets – When creating Excel files users can actually choose to hide worksheets within the files. By default, hidden worksheets within Excel files are imaged. To choose to keep these worksheets hidden and thus not image them, deselect the Print Hidden Worksheets setting.
Auto Size Rows/Columns – By default all rows and columns in the Excel worksheet are auto expanded so that all information is displayed when imaging. If there are any hidden columns or rows, this setting will expose these as well so they can be imaged. To turn this setting off, deselect the Auto Size Rows/Columns setting.
Print Row/Column Headings – By default, row and column headings are not imaged within Excel files. To turn this setting on, select the Print Row/Column Headings setting.
Remove Fill/Force Text to Black and White – By default, all color is removed from the Excel spreadsheet and all text is forced to black and white. If it is decided to image with the Color For Color setting and having color Excel images is desired, then deselect the Remove Fill / Force Text to Black and White setting.
Do Not Print Headers – By default, headers within Excel files are not imaged. To image the Excel file with headers, deselect the Do Not PrintHeaders setting.
Do Not Print Footers – By default, footers within Excel files are not imaged. To image the Excel file with footers, deselect the Do Not Print Footers setting.
Word Wrap – By default, this setting is not enabled when Excel files are imaged. To turn this setting on, select the Word Wrap setting.
Note
It is highly recommended to enable this setting as a default setting. When this setting is not enabled, Excel has a limitation of 255 characters within a cell and will not go over this character count, which can lead to cutoff text within the cell. This would be avoided by enabling this setting, as the cell will wrap the text to the next line in this scenario.
Remove Repeating Columns – By default, this setting is not enabled when Excel files are imaged. To turn this setting on, select the Remove Repeating Columns setting.
Note
Enabling this setting as a default setting is recommended. When this setting is not enabled, and the Excel file has a repeating column, the column will be repeated on every image.
Remove Repeating Rows – By default, this setting is not enabled when Excel files are imaged. To turn this setting on, select the Remove Repeating Rows setting.
Note
Enabling this setting as a default setting is recommended. When this setting is not enabled, and the Excel file has a repeating row, the row will be repeated on every image.
Date/Time Fields – Date/Time Fields are dynamic objects within Excel that will update to the current date and time when accessed. Typically this is not desirable when imaging files for eDiscovery. The default behavior for these fields is to not print them, thus they will not be included in the image. To change this setting click the Do Not Print drop-down menu and choose one of the following settings:
Do Not Modify (print as is) – This setting will do nothing to these fields allowing the date/time fields to update to the current date and time when imaged.
Do Not Print – This is the default setting for Date/TIme fields. This setting will exclude these fields from the image.
Replace With Date Created – This setting will replace the date/time values within these fields with the system created date/time of the file.
Replace With Date Modified – This setting will replace the date/time values within these fields with the system modified date/time of the file.
Replace With Field Codes – This setting will replace these fields with a standard code instead of displaying a date/time value.
Filename Fields – Filename Fields are dynamic objects within Excel that will update to the current filename when accessed. The filename field can also be accompanied by the full file path of the file depending on the settings chosen by the user when inserting this field into the file. Typically this is not desirable when imaging files for eDiscovery. The default behavior for these fields is to not print them, thus they will not be included in the image. To change this setting click the Do Not Print drop-down menu and choose one of the following settings:
Do Not Modify (print as is) – This setting will do nothing to these fields allowing the filename fields to update to the current filename when imaged.
Do Not Print – This is the default setting for Filename fields. This setting will exclude these fields from the image.
Remove Path From Filename – When adding these fields to an Excel file users have the option to include the full file path to these files. It is a foregone conclusion that these files are now not at the same place they were originally, thus the file path will be incorrect. This setting will remove the file path from the filename.
Replace With Field Codes – This setting will replace these fields with a standard code instead of displaying a filename value.
Comments – A comment is a custom note that can be placed on one or multiple cells by a user to inform, remind, or explain the content of a cell or range of cells. The default setting for these fields is to not print them, thus they will not be included in the image. To change this selection click the Do Not Print drop-down menu and choose one of the following settings:
At The End Of The Sheet – This will add the note at the end of the worksheet where the comment was found. This is good in that it will not cover up any cells when displayed, but the comment may lose some value as its placement is not where the user intended and so may not make immediate sense.
As Displayed On The Sheet – This will add the note exactly where it is placed within the Excel worksheet. This is good in that it will have immediate meaning when read. The drawback to this approach is that the comment could be large enough to cover other content within the image.
Do Not Print – This is the default setting for comments, which will exclude these comments from being imaged.
Adjust To – This setting will adjust the view of the worksheet when being imaged. The default setting is 75% of normal size. To change this setting, click within the box and type the new percentage that should be used when imaging Excel files.
Print First n Pages – This setting allows the user to specify the printing of the first n amount of pages of the Excel file instead of the whole Excel file. The exported page count for an Excel file can be less than this amount if the page count specified is greater than the page count produced from the Excel file. To choose this setting, click the Print First n Pages | #
 checkbox and specify a page count.
Fit To – This setting will force the Excel file to print all file content to a specified number of pages of length and width. If the setting 1 by 1 is chosen (one page wide by one page tall), it is still possible to get more than one image for the file.
Margins – By default, the margin setting for Excel files is set to .5 for top, bottom, left and right. To change any of these settings click within the margin boxes and adjust to the desired value.
PowerPoint Options – The following explains the options that can be manipulated when imaging Word files:
Print Hidden Slides -- Select whether to print slides set as hidden from presentation.
Do Not Print Headers – Headers within PowerPoint files are imaged by default. To exclude headers from being imaged within PowerPoint files, click the Do Not Print Headers setting.
Do Not Print Footers – Footers within PowerPoint files are imaged by default. To exclude footers from being imaged within PowerPoint files, click the Do Not Print Footers setting.
Frame Slides – Select whether to output a frame for each slide (the default) or not.
Date/Time Fields – Date/Time Fields are dynamic objects within PowerPoint that will update to the current date and time when accessed. Typically this is not desirable when imaging files for eDiscovery. The default behavior for these fields is to not print them, thus they will not be included in the image. To change this setting click the Do Not Print drop-down menu and choose one of the following settings:
Do Not Modify (print as is) – This setting will do nothing to these fields allowing the date/time fields to update to the current date and time when imaged.
Do Not Print – This is the default setting for Date/TIme fields. This setting will exclude these fields from the image.
Replace With Date Created – This setting will replace the date/time values within these fields with the system created date/time of the file.
Replace With Date Modified – This setting will replace the date/time values within these fields with the system modified date/time of the file.
Output Type – Three formats are available for PowerPoint output imaging: Full Page Slides, Notes Slides (the default) or DOJ/SEC Format.
PDF Options - Print with Comments is the only option, and it is selected by default.
Job Scope – The tabs within the Job Scope contain the work product created in the various modules within the project. Select one or more items within any tab by clicking the item’s checkbox
 to set the Imaging Job Scope. Multiple items selected within one tab will be automatically combined with the OR operator when chosen to be imaged.
Image Selection – After setting all of the Imaging settings and choosing the scope to image, click the Image Selection button to create an Imaging Job which will be sent to the Environment Module.
Note
If the same scope is used after more data has been added to that scope, Discovery Manager will automatically find only the files that need to be imaged within that scope and create a second Imaging Job under that scope.
After Creating an Imaging Job
Refresh – Click the Refresh button to see the Imaging Snapshot update in real time.
Imaging Module Navigation Section – When an Imaging Job is created, the top level node of the job features an arrow > that when clicked and displays the overall scope that was used to create the Imaging Job. If the scope is used for rolling Imaging Jobs, each subsequent Imaging Job created will be displayed as a sub item underneath the top node with its own tree view. The following explains the values within each Imaging Job when the tree view is expanded:
Query – This is the scope that was used to create the Imaging Job.
Doc Count – The total number of files that were part of the Imaging Job.
Processing Time – The total time it took to image the files for the Imaging Job.
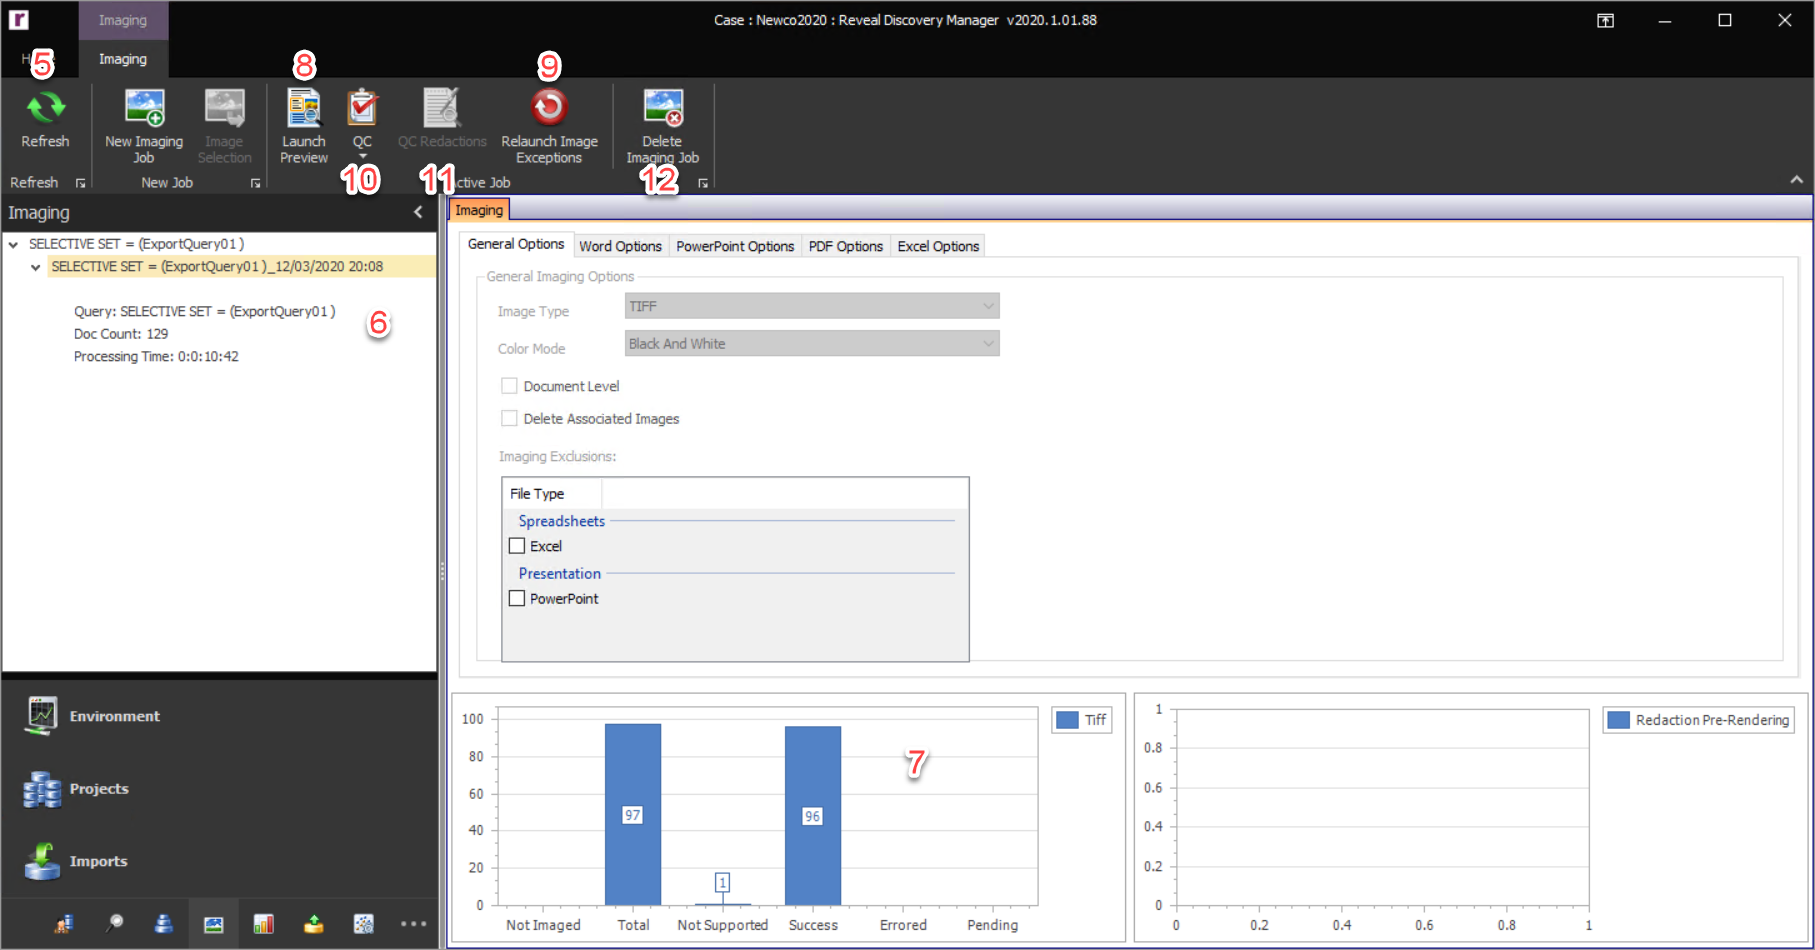
Imaging Snapshot – After Imaging Job creation has completed, the Imaging Snapshot will be populated with a bar graph with the following measurements:
Not Imaged – The total number of files not imaged within the scope or Imaging Job. If a scope is being used repeatedly to create rolling Imaging Jobs, this statistic will allow a user to immediately see if there are any new files to launch for imaging.
Total – The total number of files that have been launched for imaging. This includes those with statuses of Not Supported, Success, Errored, and Pending.
Not Supported – Total number of files that are not supported for imaging by Discovery Manager. For a complete listing please see Appendix B – Supported File Formats.
Success – The total number of files that were successfully imaged by the Discovery Agents during the imaging process.
Errored – The total number of files that were errored by the Discovery Agents during the imaging process.
Image Count – Total number of images created by the Discovery Agents during the imaging process.
Launch Preview – A Preview allows a user to see the files that are within the Imaging Job. To preview an Imaging Job, click on the scope of the Imaging Job or the individual Imaging Job in the Module Navigation, and click the Launch Preview. To see more information about using Previews, please see Appendix G.
Note
An Imaging Job Preview will only display the original files that are within the Imaging Job.
Relaunch Image Exceptions – To relaunch any image exceptions, select the Imaging Job and click the Relaunch Image Exceptions button. This will create a new Imaging Job and redistribute just the errored files back out into the environment to see if the files can be successfully imaged.
QC – To handle any image exceptions, click the QC button, and choose Image QC. For more information, see Quality Checking an Imaging Job below.
QC Redactions – To handle any redaction exceptions, click the QC Redactions button.
Delete Imaging Job – To delete an Imaging Job, select the Imaging Job, and click the Delete Imaging Job button.
Image QC Workflow
The Reveal QC application quality checks Imaging Jobs within the project. Even though Discovery Manager only images original files, all counts displayed are total counts meaning they have both original and duplicate files included in the counts.
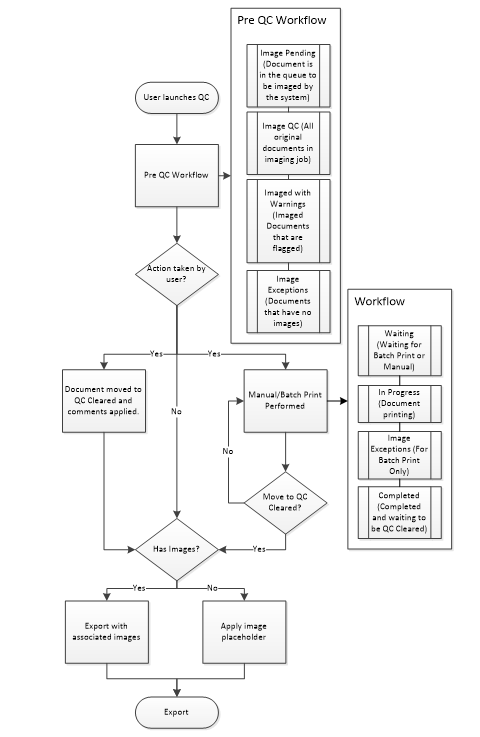
QC allows a user to quality check all Imaging Jobs or individual Imaging Jobs within the selected project. The QC workflow flowchart is displayed below. The end goal of QC is to find all files that do not have images or files that need to be printed manually, and move them to QC Cleared. All files do not have to be moved to QC Cleared. Any files that are moved to QC Cleared can have a comment associated with the files which can be exported as a field in the Export Load File, or used as a custom field on the brand of the image placeholder for files with no images.
All files that do not have images will be exported from Discovery Manager with an image placeholder. Because of this, starting with these files when quality checking an Imaging Job is recommended. All files that do not have images will be found in Image QC -> Image Exceptions. The idea here is to determine which files will have no images even when manually printed (e.g., executable files) and to move them to QC Cleared with a comment applied if necessary.
After the files that cannot be imaged are moved out of Image Exceptions, the files remaining will need to be printed manually. This can be done directly from Image QC, Image Exceptions or Imaged With Warnings, or these files can be moved to Manual where they will be placed in Manual Waiting for others to pick up and print manually as needed. After these files have been manually printed successfully they should be moved to QC Cleared and a comment applied if necessary.
It is advised to look at the files under Imaged With Warnings to see if any of the files within this group need to be put through the above workflow. These are files that have images but were also annotated with one or more of the QC Flags. If it is determined that a QC Flag is not needed, they can be removed from the user’s view as described below. All files that are within Imaged With Warnings do not have to be moved to QC Cleared. Only the files that need special handling through the QC workflow should be moved to QC Cleared (i.e. moved to QC Cleared via printing manually or erroring out the files removing all images).
Finally, it is recommended to do a spot check on the items within Image QC. All files that are within Image QC do not have to be moved to QC Cleared. Only the files that need special handling through the QC workflow should be moved to QC Cleared (i.e. moving to QC Cleared via printing manually or erroring out the files removing all images).
 |
Quality Checking an Imaging Job
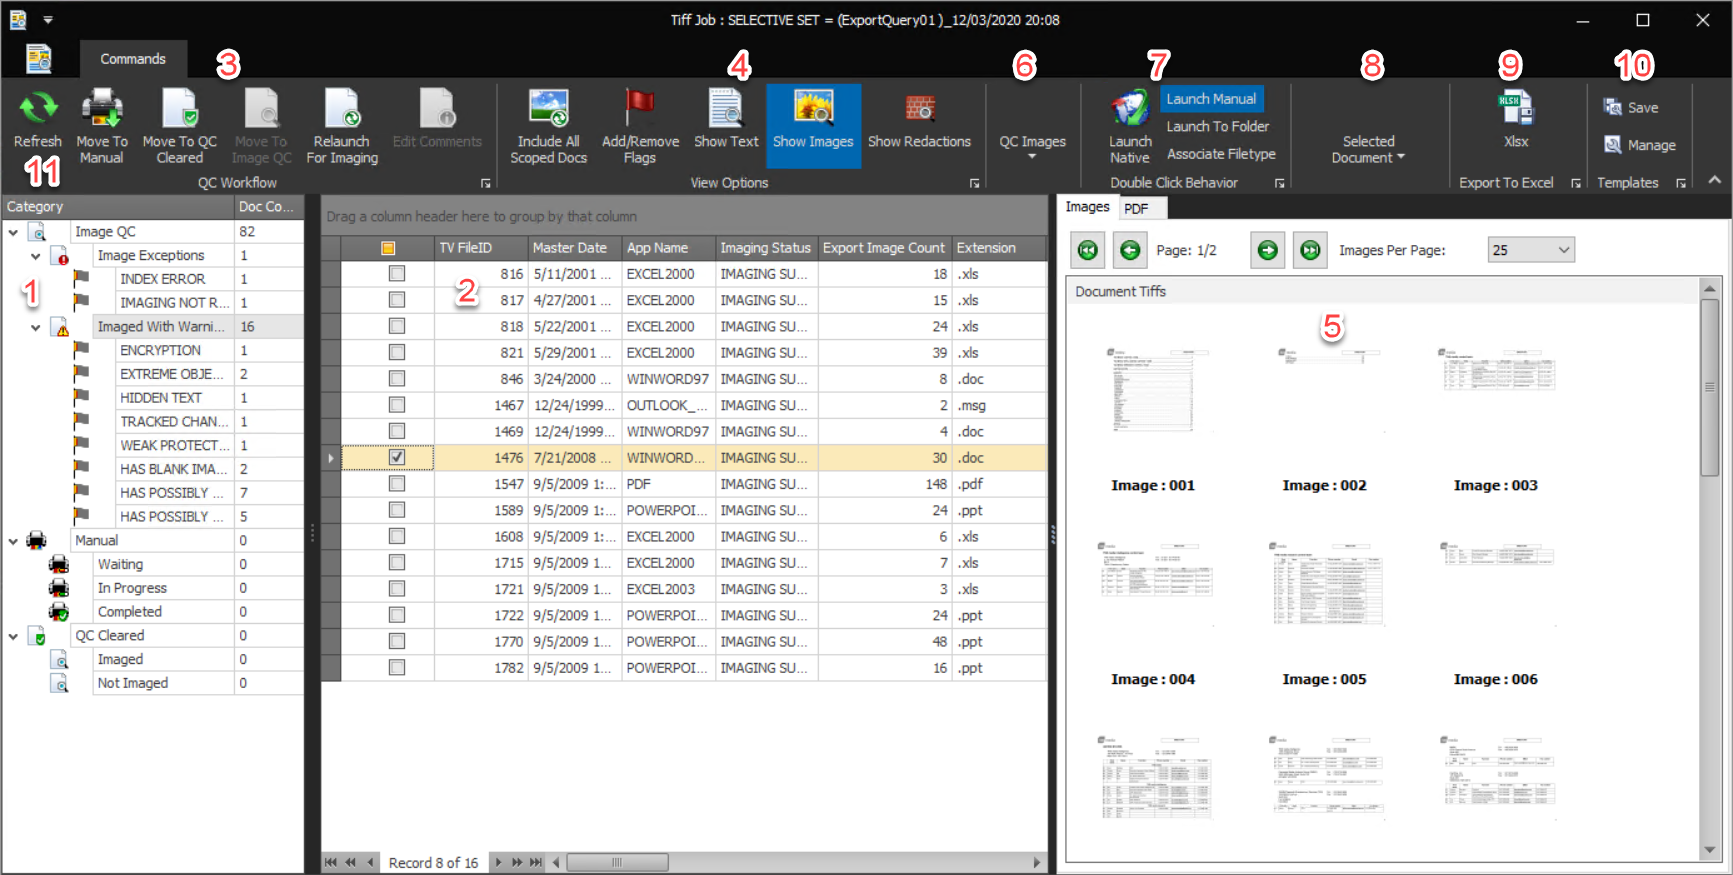
Category – The QC workflow has 3 top level categories. Each top level category also contains subcategories. When a user clicks on one of these categories, the QC table will be restricted to the view of just those files. As files are worked on in QC, the files will be moved from one category to another depending on the action taken on the file and when the user clicks the Refresh button. The following gives a breakdown of the categories:
Image QC – All original files within the Imaging Job.
Image Exceptions – All files that have no corresponding images.
Note
This is typically the best place to start within QC as these files do not have images and they may or may not be able to be imaged.
Imaged With Warnings – All files that have images but were also flagged by one or more QC Flags.
Manual – All files within the manual workflow. It is possible to manually print more than one file at a time on a single machine. There is no limitation on this; the files actually print within the printer one file at a time but multiple files can be sent to the printer.
Waiting – File(s) that have been moved to Manual in the QC workflow.
In Progress – When a file has been opened with the Double Click Behavior of Launch Manual or is in the process of being printed manually.
Completed – File(s) that have completed printing manually.
QC Cleared – The purpose of QC Cleared is to move files from Image QC to QC Cleared because they cannot be imaged (e.g. executable files) or from Manual Completed to QC Cleared. When moving files to QC Cleared, a custom comment can be added to the file(s) and can be used as a field in the Export Load File or as a custom field on the image placeholder for files with no images. These comments can be edited after the files are moved to QC Cleared as well. Files moved to QC Cleared are organized into the following two categories:
Imaged – Files that have images.
Not Imaged – Files that do not have images. These images will have an image placeholder when exported out of Discovery Manager.
Note
More than 1 file can be moved to QC Cleared, and the same controls that exist in Previews can be used. For example, a user can group the QC Documents Table by the Extension field to find all files with the same extension to move to QC Cleared.
QC Table – The QC table is used to navigate file by file within QC. Files may be selected for action using the checkbox for each row. To view a file within the viewer, click on the row in the table and the file’s images and text (depending on the View settings) will be displayed in the viewer. The up and down keys can be used to go from/to the previous/next file. To see the available settings/options, right click on the table column headers and the following form will appear:
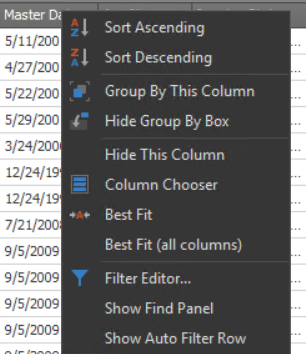
Sort – To sort the table by a particular column, click the column header or right click on the column headers and choose Sort Ascending or Sort Descending.
Group By – To group the table by a particular column, drag and drop that column above the column headers or right click on the column headers and choose Group By This Column. To clear a grouping right click next to the field the table is grouped by and choose Clear Grouping.
Column Management – To add or remove columns within the table, click Column Chooser and a listing of all available fields will be displayed. To add the field as the last field in the table, double click on the field in the Column Chooser box. To add the field to a certain location in the table, drag and drop the field to the desired position.
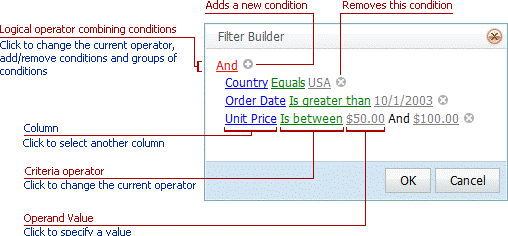
Filter Preview Table – To filter the Preview table, click on the Filter Editor and the following form will appear:
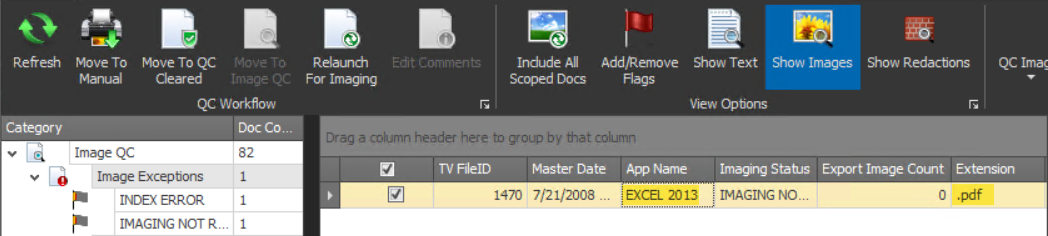
QC Workflow – To move a file(s) in the QC workflow, click the checkbox
 next to the file(s) in the QC Table and click the applicable QC Workflow button. The file(s) will receive an icon in the Pending Action column within the QC table providing the user the location where the file(s) will be moved in the QC workflow once the user clicks the Refresh button
Move To Manual – To move files to the Manual Imaging Workflow, select the file(s), click the Move To Manual button, and click the Refresh button. This will move the files to Manual Waiting. Alternatively, a file can be printed manually immediately out of the Image QC population. To launch a file to print it manually, click the Launch Manual button, double click on the row within the QC table for the file, format the file if needed and print it manually.
Note
When a file is launched to print manually, the print driver is set automatically to the appropriate driver.
Move to QC Cleared – The purpose of moving files to QC Cleared is to add the custom comment to the files. For example, if a file is an executable file, no images will be created for this file, so this file could be moved to QC Cleared with the comment ‘Cannot Image’. This comment field can be used to brand on the image placeholder as well as within the DAT file at export time. To move files to QC Cleared, select the file(s), click the Move To QC Cleared button, and click the Refresh button.
Move To Image QC – If a file needs to go through QC again (i.e. from QC Cleared), select the file(s), click the Move To Image QC button, and click the Refresh button.
Relaunch For Imaging – If having the system image errored files again is desired, select the file(s), click the Relaunch For Imaging button, and click the Refresh button.
Edit Comments – To edit the comments applied to files moved to QC Cleared, select the file(s), click the Edit Comments button, and click the Refresh button.
View Options – There are three different View Options that can all be enabled or singularly enabled:
Include All Scoped Docs – All documents within the selected QC scope will be viewable by default.
Add/Remove Flags – QC Flags are the individual flags that are displayed underneath the QC categories. By default, all QC Flags are shown when QC is launched for an Imaging Job. To remove a QC Flag from the view, click the Add/Remove Flags button and deselect the flag(s) that need to be removed.
Show Text – The Text tab for the selected file within the QC table will not be displayed within the viewer by default. To show the Text tab for the selected file, click the Show Text button.
Show Images – The images tab for the selected file within the QC Table will be displayed within the viewer by default. To remove the image tab from the viewer, click the Show Images button.
Show Redactions – Any redacted images and text for the selected file within the QC table will not be shown within the viewer by default. To show the redacted images and text for the selected file click the Show Redactions button.
Viewer – The viewer within QC can display images and text depending on the View Options selected within QC. By default, images will display within the viewer.
Images Viewer – Displays page images for the file selected within the QC table. The following are settings within the Images Viewer:
Page Navigation – To go to the previous or next page within the images viewer click the

 buttons respectively. To go to the first or last page within the file click the
 buttons respectively.
Images Per Page – By default, the Images Viewer will display 25 images per tab page at one time. To change this, click the
 drop-down menu and choose a different value.
Text Viewer – The text viewer will automatically highlight any search term(s) to which the file is responsive. To navigate between hits, click the Previous/Next Hit buttons.
Find – To search the file for a term that has not been added to the project, type the term into the Find textbox and click the Find button. The Previous/Next Hit buttons can be used to navigate between hits.
Note
To clear this term from the Previous/Next Hit navigation, remove the term from the Find textbox and click the Find button and this will clear the search.
QC Images – The goal of QC Images is to remove any blank pages from a file. To assist in this, Discovery Manager has the following features:
Blank Page Detection – Images identified as being blank are not exported by Discovery Manager. These images are represented in the Images Viewer with red text for their page number. To isolate these files within the QC table, click the HAS BLANK IMAGES flag under Add/Remove Flags. To view just the images that are blank, deselect Show Valid Images and Show Possibly Blank Images.
Possibly Blank Pages Detection – Images identified as being possibly blank will be exported by Discovery Manager. These images are represented in the Images Viewer with orange text for their page number. To isolate these files within the QC table, click the HAS POSSIBLY BLANK IMAGES flag under Add/Remove Flags. To view just the images that are possibly blank, deselect Show Valid Images and Show Blank Images.
Mark Blank – To mark a page blank, click on the page in the Images Viewer and click the Mark Blank button. To mark several pages blank, hold the Ctrl button while selecting several pages and click the Mark Blank button. Any image marked blank will have its page number text changed to red and will not be exported out by the system.
Mark Valid – To mark a page valid that was marked as blank by the system or by a user, click on the page in the Images Viewer and click the Mark Valid button. To mark several pages valid, hold the Ctrl button while selecting several pages and click the Mark Valid button. Any image marked blank will have its page number text changed to black and will be exported out by the system.
Double Click Behavior – The double click behavior defines what will happen when a user double clicks on a row within the QC table. There are three settings only one of which can be used at a time:
Launch Native – This is the default setting. When a user double clicks on a row within the QC grid, it will launch that file to the native application that file is associated with within Windows.
Launch Manual – To launch a file to print it manually, click the Launch Manual button, double click on the row within the QC table for the file, format the file if needed, and print it manually.
Note
When a file is launched to print manually, the print driver is set automatically to the appropriate driver.
Launch To Folder – To launch the native file to a folder to get a working copy of the native file, click the Launch To Folder button and double click on the row within the QC table.
Associate Filetype – If it is preferred that the file launch to a different application when the file is launched natively, click the Associate Filetype button, then double click on the row within the QC table and change the default application that the native file is associated with within windows. This is applicable when an alternative application is found to view the native file that is preferred over the previous native application, for example, WinWord Viewer as opposed to Word 2016.
Selected Document – The Selected Document section within QC provides the file’s Discovery Manager FileID as well as the file name of the document selected within the Preview table.
Export To Excel – To export the QC Documents table to an Excel file holding its groupings, counts, and columns, click the Export To Excel button.
Note
There is a grouping expand/collapse navigation within the Excel file. To use this navigation, open the Excel file and notice the numbers in the upper left hand corner next to the column A. This number will correlate to the number of grouping within the QC Documents table. For example, when exporting the Processing Exceptions -> File Exceptions this navigation will look like
 when it is opened. If ‘1’ is selected, all groupings will be collapsed to the top level, and so forth. Alternatively, the
 buttons can be used to expand/collapse individual groupings within the Excel file.
Templates – Templates provide the user the ability to save the current Preview settings, including selected fields, field groupings, etc., on the project and global level. This feature coupled with the Export To Excel feature allows users to create customizable reports. There are two buttons associated with Templates that manage these features:
Save – To save the current Preview’s settings, click the Save button, give the template a name, choose the Project Scope (Project to save the template only within the project, and Global to save the template across projects), then click Save.
Manage – To load a previously saved template, click the Manage button, choose the template, and click the Load Template button. There is also an option to select and delete a template here.
Refresh – To move files to their proper QC Category, click the Refresh button and the file will be moved to the proper location within the workflow.